
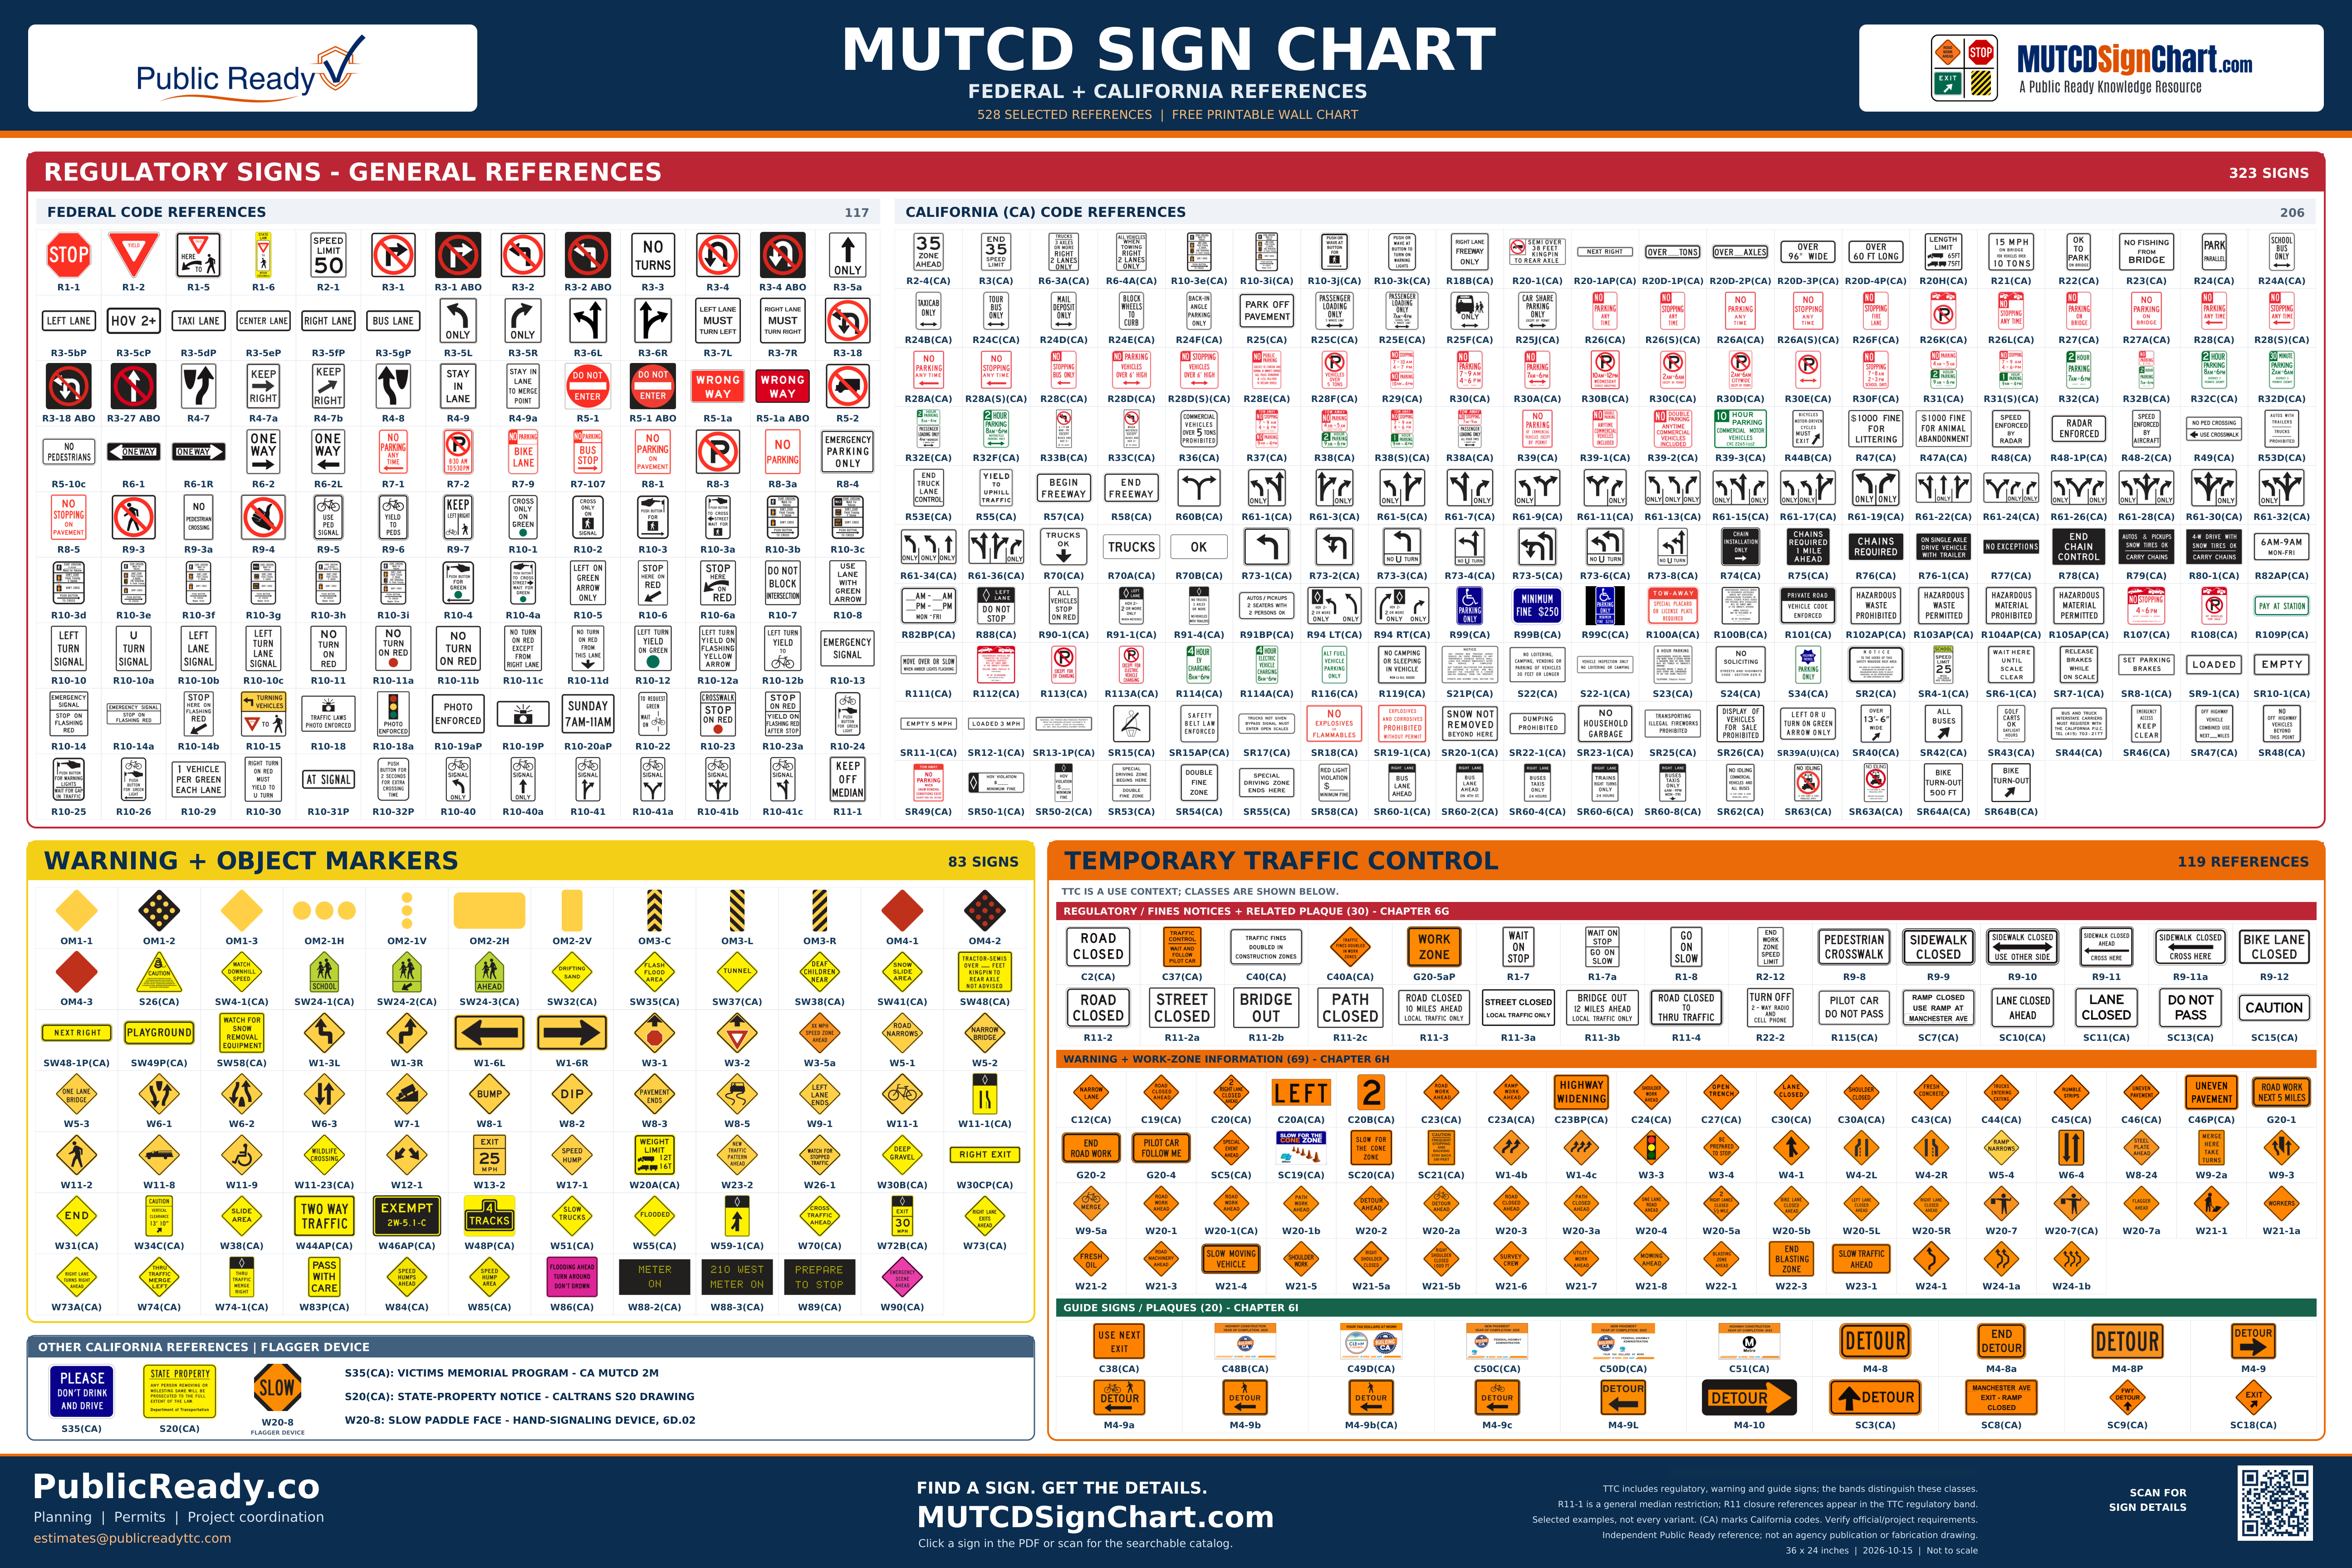
528 selected examples
MUTCD Sign Chart — Federal + California
528 selected federal and California sign references. A 36 × 24-inch wall chart with regulatory signs, warnings, object markers and temporary traffic control references. Every sign in the PDF links to its individual catalog page.
5184 × 3456-pixel PNG; one-page PDF. Compiled October 15, 2026. Use the image above to open the full-resolution chart.
Use this chart for identification
This selection is not a complete inventory, an approved sign schedule, or an official FHWA or Caltrans publication. Codes and drawings identify designs; their permitted size, placement, and use depend on the current manual and agency requirements. Directional and legend variants may differ from the displayed example.
Read the traffic-sign manual guide →Signs in this chart
Open a sign to review its meaning, California notes, dimensions, and linked official references.
- R1-1 · Stop →
Requires every driver to come to a complete stop at the marked stop line, crosswalk, or intersection before proceeding when it is safe.
- R1-2 · Yield →
Requires drivers to slow down and yield the right-of-way to traffic and pedestrians, stopping only if necessary to avoid a conflict.
- R1-5 · Yield Here to Pedestrians →
Identifies the point where drivers are to yield for pedestrians at a crossing. The arrow points toward the intended yielding location in advance of the crosswalk.
- R1-6 · In-Street Pedestrian Crossing - Yield →
An in-street crossing sign reminding drivers of the requirement to yield to pedestrians within the crosswalk. Its pedestrian and yield symbols reinforce the crossing rule at the location.
- R2-1 · Speed Limit →
Posts the maximum legal speed for the roadway, establishing the enforceable speed limit drivers must not exceed.
- R3-1 · No Right Turn →
Prohibits a right turn at the intersection or location where the sign is posted, making it a traffic law violation to turn right.
- R3-1 ABO · Activated Blank-Out Sign (based on Federal MUTCD R3-1 sign) →
The Caltrans R3-1 ABO specification covers Activated Blank-Out Sign (based on Federal MUTCD R3-1 sign). Its official drawing provides the sign legend, layout, and design notes.
- R3-2 · No Left Turn →
Prohibits a left turn at the intersection or location where the sign is posted, making it a traffic law violation to turn left.
- R3-2 ABO · Activated Blank-Out Sign (based on Federal MUTCD R3-2 sign) →
The Caltrans R3-2 ABO specification covers Activated Blank-Out Sign (based on Federal MUTCD R3-2 sign). Its official drawing provides the sign legend, layout, and design notes.
- R3-3 · No Turns →
Prohibits all turning movements — both right and left turns — at the intersection where the word-legend NO TURNS sign is posted.
- R3-4 · No U-Turn →
Prohibits a U-turn at the location where the sign is posted, shown with the U-turn arrow symbol inside a red prohibition circle and slash.
- R3-4 ABO · Activated Blank-Out Sign (based on Federal MUTCD R3-4 sign) →
The Caltrans R3-4 ABO specification covers Activated Blank-Out Sign (based on Federal MUTCD R3-4 sign). Its official drawing provides the sign legend, layout, and design notes.
- R3-5a · Through Only →
Requires drivers in this lane or approach to proceed straight through the intersection only, prohibiting turning movements.
- R3-5bP · Left Lane →
A supplemental LEFT LANE plaque used above or below a mandatory-movement lane-control sign (the R3-5 series) to show that the required movement applies to the left lane. It carries the word legend LEFT LANE and is not used alone.
- R3-5cP · HOV 2+ →
A supplemental HOV 2+ plaque used with a lane-control sign to show that the lane is reserved for high-occupancy vehicles carrying two or more occupants. It carries the word legend HOV 2+ and is not used alone.
- R3-5dP · Taxi Lane →
A supplemental TAXI LANE plaque used with a lane-control sign to show that the lane is reserved for taxis. It carries the word legend TAXI LANE and is not used alone.
- R3-5eP · Center Lane →
A supplemental CENTER LANE plaque used above or below a mandatory-movement lane-control sign (the R3-5 series) to show that the required movement applies to the center lane. It carries the word legend CENTER LANE and is not used alone.
- R3-5fP · Right Lane →
A supplemental RIGHT LANE plaque used above or below a mandatory-movement lane-control sign (the R3-5 series) to show that the required movement applies to the right lane. It carries the word legend RIGHT LANE and is not used alone.
- R3-5gP · Bus Lane →
A supplemental BUS LANE plaque used with a lane-control sign to show that the lane is reserved for buses. It carries the word legend BUS LANE and is not used alone.
- R3-5L · Left Turn Only →
Requires drivers in this lane or approach to turn left, using a curved left-turn arrow over the ONLY legend. It prohibits any other movement from that lane.
- R3-5R · Right Turn Only →
Requires drivers in this lane or approach to turn right, using a curved right-turn arrow over the ONLY legend. It prohibits any other movement from that lane.
- R3-6L · Optional Movement Lane Control (Left) →
Tells drivers in this lane that they may either continue straight or turn left, shown by the combined straight and left-turn arrows. Unlike the mandatory R3-5 series, the movement is optional.
- R3-6R · Optional Movement Lane Control (Right) →
Tells drivers in this lane that they may either continue straight or turn right, shown by the combined straight and right-turn arrows. Unlike the mandatory R3-5 series, the movement is optional.
- R3-7L · Left Lane Must Turn Left →
Requires all traffic in the left lane to turn left at the intersection. It is a word-message lane-use control sign that removes any doubt about the mandatory movement for that lane.
- R3-7R · Right Lane Must Turn Right →
Requires all traffic in the right lane to turn right at the intersection. It is a word-message lane-use control sign that removes any doubt about the mandatory movement for that lane.
- R3-18 · No Left or U Turn →
Prohibits both a left turn and a U-turn at the location where the sign is posted, shown with the combined left-turn and U-turn arrow symbol inside a red prohibition circle and slash.
- R3-18 ABO · Activated Blank-Out Sign (based on Federal MUTCD R3-18 sign) →
The Caltrans R3-18 ABO specification covers Activated Blank-Out Sign (based on Federal MUTCD R3-18 sign). Its official drawing provides the sign legend, layout, and design notes.
- R3-27 ABO · Activated Blank-Out Sign (based on Federal MUTCD R3-27 sign) →
The Caltrans R3-27 ABO specification covers Activated Blank-Out Sign (based on Federal MUTCD R3-27 sign). Its official drawing provides the sign legend, layout, and design notes.
- R4-7 · Keep Right →
Directs traffic to pass to the right of an obstruction or traffic island. The curved arrow shows the required side of passage.
- R4-7a · Keep Right (Horizontal Arrow) →
Directs traffic to pass to the right of an obstruction. This version combines the words KEEP RIGHT with a horizontal right-pointing arrow.
- R4-7b · Keep Right (Diagonal Arrow) →
Directs traffic to pass to the right of an obstruction. This version combines the words KEEP RIGHT with an upward diagonal right-pointing arrow.
- R4-8 · Keep Left →
Directs traffic to pass to the left of an obstruction or traffic island. The curved arrow shows the required side of passage.
- R4-9 · Stay in Lane →
Instructs drivers to remain in their lane through the signed area. It discourages lane changing where maintaining lane position is required.
- R4-9a · Stay in Lane to Merge Point →
Instructs drivers to remain in their lane until they reach the merge point. It identifies an arrangement in which the merge occurs at the designated point rather than earlier in the approach.
- R5-1 · Do Not Enter →
Prohibits entry into a roadway or lane, telling drivers they must not proceed past the sign in that direction.
- R5-1 ABO · Activated Blank-Out Sign (based on Federal MUTCD R5-1 sign) →
The Caltrans R5-1 ABO specification covers Activated Blank-Out Sign (based on Federal MUTCD R5-1 sign). Its official drawing provides the sign legend, layout, and design notes.
- R5-1a · Wrong Way →
Warns drivers that they are traveling against the permitted direction of traffic. The red WRONG WAY sign faces traffic entering or proceeding in the prohibited direction.
- R5-1a ABO · Activated Blank-Out Sign (based on Federal MUTCD R5-1a sign) →
The Caltrans R5-1a ABO specification covers Activated Blank-Out Sign (based on Federal MUTCD R5-1a sign). Its official drawing provides the sign legend, layout, and design notes.
- R5-2 · No Trucks →
Prohibits trucks from entering the roadway or route where the sign is posted, shown with the truck symbol inside a red prohibition circle and slash.
- R5-10c · No Pedestrians →
Prohibits pedestrians from entering the signed roadway or facility. Its word message identifies the road-user group to which the restriction applies.
- R6-1 · One Way (Left) →
Indicates that traffic on the roadway flows in one direction only, to the left, as shown by the horizontal arrow.
- R6-1R · One Way (Right) →
Indicates that traffic on the roadway flows in one direction only, to the right, as shown by the horizontal arrow.
- R6-2 · One Way (Right) →
Indicates that traffic on the roadway flows in one direction only, to the right, as shown by the arrow below the ONE WAY legend.
- R6-2L · One Way (Left) →
Indicates that traffic on the roadway flows in one direction only, to the left, as shown by the arrow below the ONE WAY legend.
- R7-1 · No Parking Any Time →
Prohibits parking at any time within the signed area. Any directional arrows on the installed sign define the extent of the restriction.
- R7-2 · No Parking (Part-Time) →
Prohibits parking during the days and hours displayed on the sign. The schedule on the installed sign determines when the restriction applies.
- R7-9 · No Parking Bike Lane →
Prohibits parking in the bicycle lane. The bicycle-lane message identifies the space that must be kept clear of parked vehicles.
- R7-107 · No Parking Bus Stop →
Prohibits parking in the signed bus-stop area. It identifies curb space that must remain available for bus service.
- R8-1 · No Parking on Pavement →
Prohibits parking on the paved roadway. The restriction specifically identifies the pavement rather than a time-limited parking zone.
- R8-3 · No Parking (symbol) →
Uses the crossed-out P symbol to prohibit parking. Supplemental information or arrows, where provided, define the location or extent of the restriction.
- R8-3a · No Parking →
Uses the words NO PARKING to prohibit parking in the signed area. It is the word-message alternative to the parking-prohibition symbol.
- R8-4 · Emergency Parking Only →
Limits parking in the signed area to emergencies. Routine or convenience parking is not the use identified by this message.
- R8-5 · No Stopping on Pavement →
Prohibits stopping on the paved roadway. Its restriction addresses stopping, rather than only leaving a vehicle parked.
- R9-3 · No Pedestrian Crossing (symbol) →
The R9-3 No Pedestrians sign prohibits pedestrian travel along or across the roadway at that location. It uses the pedestrian symbol within a red circle and diagonal slash, and is typically posted where a sidewalk or crossing is closed and pedestrians must use an alternate route.
- R9-3a · No Pedestrian Crossing →
Prohibits pedestrians from crossing at the location where the word-legend NO PEDESTRIAN CROSSING sign is posted, directing them to a designated crossing instead.
- R9-4 · No Hitchhiking (symbol) →
Uses a prohibition symbol over a hitchhiking figure to indicate that hitchhiking is not permitted at the signed location.
- R9-5 · Bicycles Use Pedestrian Signal →
Directs bicyclists to use the pedestrian signal indications at the crossing. The message identifies which signal controls the bicycle crossing movement.
- R9-6 · Bicycles Yield to Pedestrians →
Requires bicyclists to yield the right-of-way to pedestrians, shown with the bicycle symbol and the legend YIELD TO PEDS.
- R9-7 · Shared-Use Path Restriction →
Separates bicycle and pedestrian use of a shared-use path. The symbols and dividing line identify the side assigned to each group.
- R10-1 · Cross Only on Green →
Directs pedestrians to cross only on the green signal indication.
- R10-2 · Cross Only on Walk Signal →
Directs pedestrians to cross only when the walk indication is displayed.
- R10-3 · Push Button for Walk Signal →
Identifies the push button used to request a pedestrian walk indication.
- R10-3a · Push Button to Cross Street — Wait for Walk Signal →
Tells pedestrians to push the button for the indicated crossing and wait for the walk signal.
- R10-3b · Push Button Educational — Symbolic Signals →
Explains the symbolic pedestrian signal indications and the push-button request.
- R10-3c · Push Button Educational — Word Signals →
Explains WALK and DONT WALK word indications and the push-button request.
- R10-3d · Push Button Educational — Two-Stage Crossing →
Explains the pedestrian indications for a crossing completed in two stages with a median refuge.
- R10-3e · Push Button Educational — Countdown Signal →
Explains the symbolic pedestrian indications and countdown display.
- R10-3f · Push Button Educational — Symbolic Signals and Street Name →
Names the crossing street and explains symbolic pedestrian signal indications.
- R10-3g · Push Button Educational — Word Signals and Street Name →
Names the crossing street and explains WALK and DONT WALK word indications.
- R10-3h · Push Button Educational — Street Name and Two-Stage Crossing →
Names the crossing street and explains a two-stage pedestrian crossing to a median refuge.
- R10-3i · Push Button Educational — Countdown Signal and Street Name →
Names the crossing street and explains countdown pedestrian signal indications.
- R10-4 · Push Button for Green Signal →
Identifies a push button used to request a green signal indication.
- R10-4a · Push Button — Wait for Green Signal →
Tells the user to push the button for the indicated crossing and wait for green.
- R10-5 · Left on Green Arrow Only →
Tells drivers that the indicated left turn is permitted only on a green arrow.
- R10-6 · Stop Here on Red →
Identifies the location where drivers must stop for a red signal.
- R10-6a · Stop Here on Red (Side Arrow) →
Identifies the red-signal stopping location using a side-directed arrow.
- R10-7 · Do Not Block Intersection →
Tells drivers to keep the intersection clear rather than enter when they cannot proceed through it.
- R10-8 · Use Lane with Green Arrow →
Directs road users to the lane indicated by a green lane-use control arrow.
- R10-10 · Right (Left) Turn Signal →
Identifies the traffic signal controlling the indicated turn movement.
- R10-10a · U Turn Signal →
Identifies a signal face that exclusively controls a U-turn movement.
- R10-10b · Left (Right) Lane Signal →
Identifies a separate signal face controlling the indicated lane at a grade crossing pre-signal or queue cutter signal.
- R10-10c · Left (Right) Turn Lane Signal →
Identifies a separate signal face controlling the indicated turn lane at a grade crossing pre-signal or queue cutter signal.
- R10-11 · No Turn on Red →
Prohibits the applicable turn while the controlling signal displays red.
- R10-11a · No Turn on Circular Red →
Uses a circular red symbol in a NO TURN ON RED message.
- R10-11b · No Turn on Red (Square) →
Displays the NO TURN ON RED word message in a square layout.
- R10-11c · No Turn on Red Except From Right Lane →
Prohibits turns on red except from the right lane.
- R10-11d · No Turn on Red From This Lane →
Prohibits a turn on red from the lane identified by the downward arrow.
- R10-12 · Left Turn Yield on Green →
Tells left-turning drivers to yield when turning on a circular green signal.
- R10-12a · Left Turn Yield on Flashing Yellow Arrow →
Tells left-turning drivers to yield when the signal displays a flashing yellow arrow.
- R10-12b · Left Turn Yield to Bicycles →
Tells left-turning drivers to yield to a conflicting bicycle movement.
- R10-13 · Emergency Signal →
Identifies a traffic control signal used for emergency-vehicle access.
- R10-14 · Emergency Signal — Stop on Flashing Red →
Identifies an emergency signal and instructs drivers to stop on flashing red.
- R10-14a · Emergency Signal — Stop on Flashing Red (Overhead) →
Provides the emergency-signal flashing-red stop instruction in a horizontal overhead layout.
- R10-14b · Stop Here on Flashing Red →
Identifies where drivers stop for a flashing-red indication.
- R10-15 · Turning Vehicles Yield to Pedestrians →
Reminds turning drivers to yield to pedestrians crossing the path of the turn.
- R10-18 · Traffic Laws Photo Enforced →
Notifies road users that traffic laws are enforced using photographic equipment.
- R10-18a · Traffic Signal Photo Enforced →
Notifies road users of photographic enforcement of traffic-signal compliance.
- R10-19aP · Photo Enforced — Word Plaque →
Adds a PHOTO ENFORCED word message to an applicable parent sign.
- R10-19P · Photo Enforced — Symbol Plaque →
Uses the camera symbol to identify photo enforcement associated with the parent sign.
- R10-20aP · Time-Restricted No Turn on Red Plaque →
States the days and times during which the associated turn-on-red prohibition applies.
- R10-22 · Bicycle Detector →
Identifies where a bicycle should be positioned to actuate the traffic signal.
- R10-23 · Crosswalk — Stop on Red →
Directs drivers to stop on red at a crosswalk controlled by a pedestrian hybrid beacon.
- R10-23a · Stop on Red — Yield on Flashing Red After Stop →
Explains stopping on red and yielding after a stop during the flashing-red operation of a pedestrian hybrid beacon.
- R10-24 · Bicycle Push Button for Green Light →
Identifies a bicycle push button used to request a green signal indication.
- R10-25 · Push Button for Warning Lights — Wait for Gap →
Tells users to activate warning lights and wait for a suitable gap before crossing.
- R10-26 · Bicycle Push Button for Green Light — Arrow →
Identifies and points toward the bicycle push button used to request green.
- R10-29 · Vehicles per Green — Each Lane →
States how many vehicles may proceed from each lane during each green ramp-meter signal.
- R10-30 · Right Turn on Red Must Yield to U-Turn →
Tells drivers turning right on red to yield to a conflicting U-turn movement.
- R10-31P · At Signal — Plaque →
Identifies the signal location to which the associated parent-sign instruction applies.
- R10-32P · Push Button for 2 Seconds for Extra Crossing Time →
Explains a two-second push-button request for extra pedestrian crossing time.
- R10-40 · Bicycle Signal — Mandatory Turn →
Identifies the mandatory bicycle turn controlled by the bicycle signal face.
- R10-40a · Bicycle Signal — Mandatory Through Movement →
Identifies the straight-through bicycle movement controlled by the bicycle signal face.
- R10-41 · Bicycle Signal — Optional Through and Turn Movements →
Identifies the through and turn bicycle movements controlled by the bicycle signal face.
- R10-41a · Bicycle Signal — Optional Left and Right Turns →
Identifies the left- and right-turn bicycle movements controlled by the bicycle signal face.
- R10-41b · Bicycle Signal — Optional All Movements →
Identifies the left, through, and right bicycle movements controlled by the bicycle signal face.
- R10-41c · Bicycle Signal — Optional Left and Through Movements →
Identifies the left-turn and straight-through bicycle movements controlled by the bicycle signal face.
- R11-1 · Keep Off Median →
Instructs drivers to keep vehicles off the median. It prohibits using the median as a travel or crossing path at the signed location.
- R2-4(CA) · Speed Zone Ahead →
The Caltrans R2-4(CA) specification covers Speed Zone Ahead. Its official drawing provides the sign legend, layout, and design notes.
- R3(CA) · End Speed Limit →
The Caltrans R3(CA) specification covers End Speed Limit. Its official drawing provides the sign legend, layout, and design notes.
- R6-3A(CA) · TRUCKS 3 AXLES OR MORE RIGHT 2 LANES ONLY →
The Caltrans R6-3A(CA) specification covers TRUCKS 3 AXLES OR MORE RIGHT 2 LANES ONLY. Its official drawing provides the sign legend, layout, and design notes.
- R6-4A(CA) · ALL VEHICLES WHEN TOWING RIGHT 2 LANES ONLY →
The Caltrans R6-4A(CA) specification covers ALL VEHICLES WHEN TOWING RIGHT 2 LANES ONLY. Its official drawing provides the sign legend, layout, and design notes.
- R10-3e(CA) · COUNTDOWN PEDESTRIAN →
The Caltrans R10-3e(CA) specification covers COUNTDOWN PEDESTRIAN. Its official drawing provides the sign legend, layout, and design notes.
- R10-3i(CA) · COUNTDOWN PEDESTRIAN STREET NAME →
The Caltrans R10-3i(CA) specification covers COUNTDOWN PEDESTRIAN STREET NAME. Its official drawing provides the sign legend, layout, and design notes.
- R10-3j(CA) · PUSH OR WAVE AT BUTTON FOR PEDESTRIAN CROSSING →
The Caltrans R10-3j(CA) specification covers PUSH OR WAVE AT BUTTON FOR PEDESTRIAN CROSSING. Its official drawing provides the sign legend, layout, and design notes.
- R10-3k(CA) · PUSH OR WAVE AT BUTTON TO TURN ON WARNING LIGHTS →
The Caltrans R10-3k(CA) specification covers PUSH OR WAVE AT BUTTON TO TURN ON WARNING LIGHTS. Its official drawing provides the sign legend, layout, and design notes.
- R18B(CA) · RIGHT (LEFT) LANE FREEWAY ONLY →
The Caltrans R18B(CA) specification covers RIGHT (LEFT) LANE FREEWAY ONLY. Its official drawing provides the sign legend, layout, and design notes.
- R20-1(CA) · No Trucks Variable Message →
The Caltrans R20-1(CA) specification covers No Trucks Variable Message. Its official drawing provides the sign legend, layout, and design notes.
- R20-1AP(CA) · NEXT RIGHT Plaque →
The Caltrans R20-1AP(CA) specification covers NEXT RIGHT Plaque. Its official drawing provides the sign legend, layout, and design notes.
- R20D-1P(CA) · OVER __ TONS (truck exclusion plaque) →
The Caltrans R20D-1P(CA) specification covers OVER __ TONS (truck exclusion plaque). Its official drawing provides the sign legend, layout, and design notes.
- R20D-2P(CA) · OVER __ AXLES (truck exclusion plaque) →
The Caltrans R20D-2P(CA) specification covers OVER __ AXLES (truck exclusion plaque). Its official drawing provides the sign legend, layout, and design notes.
- R20D-3P(CA) · OVER 96 INCHES WIDE (truck exclusion plaque) →
The Caltrans R20D-3P(CA) specification covers OVER 96 INCHES WIDE (truck exclusion plaque). Its official drawing provides the sign legend, layout, and design notes.
- R20D-4P(CA) · OVER 60 FT LONG (truck exclusion plaque) →
The Caltrans R20D-4P(CA) specification covers OVER 60 FT LONG (truck exclusion plaque). Its official drawing provides the sign legend, layout, and design notes.
- R20H(CA) · Truck Length Limit →
The Caltrans R20H(CA) specification covers Truck Length Limit. Its official drawing provides the sign legend, layout, and design notes.
- R21(CA) · Bridge Speed and Weight Limit →
The Caltrans R21(CA) specification covers Bridge Speed and Weight Limit. Its official drawing provides the sign legend, layout, and design notes.
- R22(CA) · OK TO PARK ON BRIDGE →
The Caltrans R22(CA) specification covers OK TO PARK ON BRIDGE. Its official drawing provides the sign legend, layout, and design notes.
- R23(CA) · NO FISHING (JUMPING) FROM BRIDGE →
The Caltrans R23(CA) specification covers NO FISHING (JUMPING) FROM BRIDGE. Its official drawing provides the sign legend, layout, and design notes.
- R24(CA) · PARK PARALLEL →
The Caltrans R24(CA) specification covers PARK PARALLEL. Its official drawing provides the sign legend, layout, and design notes.
- R24A(CA) · SCHOOL BUS ONLY w/Double Arrow →
The Caltrans R24A(CA) specification covers SCHOOL BUS ONLY w/Double Arrow. Its official drawing provides the sign legend, layout, and design notes.
- R24B(CA) · TAXI CAB ONLY w/Double Arrow →
The Caltrans R24B(CA) specification covers TAXI CAB ONLY w/Double Arrow. Its official drawing provides the sign legend, layout, and design notes.
- R24C(CA) · TOUR BUS ONLY w/ Double Arrow →
The Caltrans R24C(CA) specification covers TOUR BUS ONLY w/ Double Arrow. Its official drawing provides the sign legend, layout, and design notes.
- R24D(CA) · MAIL DEPOSIT ONLY w/ Double Arrow →
The Caltrans R24D(CA) specification covers MAIL DEPOSIT ONLY w/ Double Arrow. Its official drawing provides the sign legend, layout, and design notes.
- R24E(CA) · BLOCK WHEELS TO CURB →
The Caltrans R24E(CA) specification covers BLOCK WHEELS TO CURB. Its official drawing provides the sign legend, layout, and design notes.
- R24F(CA) · BACK-IN ANGLE PARKING ONLY →
The Caltrans R24F(CA) specification covers BACK-IN ANGLE PARKING ONLY. Its official drawing provides the sign legend, layout, and design notes.
- R25(CA) · PARK OFF PAVEMENT →
The Caltrans R25(CA) specification covers PARK OFF PAVEMENT. Its official drawing provides the sign legend, layout, and design notes.
- R25C(CA) · PASSENGER LOADING ONLY 5 MINUTE LIMIT w/ Double Arrow →
The Caltrans R25C(CA) specification covers PASSENGER LOADING ONLY 5 MINUTE LIMIT w/ Double Arrow. Its official drawing provides the sign legend, layout, and design notes.
- R25E(CA) · PASSENGER LOADING ONLY 7AM TO 4PM SCHOOL DAYS 5 MINUTE LIMIT w/ Double Arrow →
The Caltrans R25E(CA) specification covers PASSENGER LOADING ONLY 7AM TO 4PM SCHOOL DAYS 5 MINUTE LIMIT w/ Double Arrow. Its official drawing provides the sign legend, layout, and design notes.
- R25F(CA) · School Bus Passenger Loading ONLY w/ Double Arrow →
The Caltrans R25F(CA) specification covers School Bus Passenger Loading ONLY w/ Double Arrow. Its official drawing provides the sign legend, layout, and design notes.
- R25J(CA) · CAR SHARE PARKING ONLY PERMIT REQUIRED w/ Double Arrow →
The Caltrans R25J(CA) specification covers CAR SHARE PARKING ONLY PERMIT REQUIRED w/ Double Arrow. Its official drawing provides the sign legend, layout, and design notes.
- R26(CA) · NO PARKING ANY TIME →
The Caltrans R26(CA) specification covers NO PARKING ANY TIME. Its official drawing provides the sign legend, layout, and design notes.
- R26(S)(CA) · NO STOPPING ANY TIME →
The Caltrans R26(S)(CA) specification covers NO STOPPING ANY TIME. Its official drawing provides the sign legend, layout, and design notes.
- R26A(CA) · NO PARKING ANY TIME →
The Caltrans R26A(CA) specification covers NO PARKING ANY TIME. Its official drawing provides the sign legend, layout, and design notes.
- R26A(S)(CA) · NO STOPPING ANY TIME →
The Caltrans R26A(S)(CA) specification covers NO STOPPING ANY TIME. Its official drawing provides the sign legend, layout, and design notes.
- R26F(CA) · NO STOPPING FIRE LANE →
The Caltrans R26F(CA) specification covers NO STOPPING FIRE LANE. Its official drawing provides the sign legend, layout, and design notes.
- R26K(CA) · Tow-Away No Parking →
The Caltrans R26K(CA) specification covers Tow-Away No Parking. Its official drawing provides the sign legend, layout, and design notes.
- R26L(CA) · Tow-Away NO STOPPING ANY TIME →
The Caltrans R26L(CA) specification covers Tow-Away NO STOPPING ANY TIME. Its official drawing provides the sign legend, layout, and design notes.
- R27(CA) · NO PARKING ON BRIDGE →
The Caltrans R27(CA) specification covers NO PARKING ON BRIDGE. Its official drawing provides the sign legend, layout, and design notes.
- R27A(CA) · NO PARKING ON BRIDGE →
The Caltrans R27A(CA) specification covers NO PARKING ON BRIDGE. Its official drawing provides the sign legend, layout, and design notes.
- R28(CA) · NO PARKING ANY TIME with Arrow →
The Caltrans R28(CA) specification covers NO PARKING ANY TIME with Arrow. Its official drawing provides the sign legend, layout, and design notes.
- R28(S)(CA) · NO STOPPING ANY TIME with Arrow →
The Caltrans R28(S)(CA) specification covers NO STOPPING ANY TIME with Arrow. Its official drawing provides the sign legend, layout, and design notes.
- R28A(CA) · NO PARKING ANY TIME with Arrow →
The Caltrans R28A(CA) specification covers NO PARKING ANY TIME with Arrow. Its official drawing provides the sign legend, layout, and design notes.
- R28A(S)(CA) · NO STOPPING ANY TIME with Arrow →
The Caltrans R28A(S)(CA) specification covers NO STOPPING ANY TIME with Arrow. Its official drawing provides the sign legend, layout, and design notes.
- R28C(CA) · NO STOPPING BUS ONLY w/ Arrow →
The Caltrans R28C(CA) specification covers NO STOPPING BUS ONLY w/ Arrow. Its official drawing provides the sign legend, layout, and design notes.
- R28D(CA) · NO PARKING VEHICLES OVER 6' HIGH w/ Double Arrow →
The Caltrans R28D(CA) specification covers NO PARKING VEHICLES OVER 6' HIGH w/ Double Arrow. Its official drawing provides the sign legend, layout, and design notes.
- R28D(S)(CA) · NO STOPPING VEHICLES OVER 6' HIGH w/ Double Arrow →
The Caltrans R28D(S)(CA) specification covers NO STOPPING VEHICLES OVER 6' HIGH w/ Double Arrow. Its official drawing provides the sign legend, layout, and design notes.
- R28E(CA) · NO PUBLIC PARKING SUBJECT TO CITATION AND REMOVAL AT OWNER'S EXPENSE →
The Caltrans R28E(CA) specification covers NO PUBLIC PARKING SUBJECT TO CITATION AND REMOVAL AT OWNER'S EXPENSE. Its official drawing provides the sign legend, layout, and design notes.
- R28F(CA) · No Parking VEHICLES OVER 5 TONS →
The Caltrans R28F(CA) specification covers No Parking VEHICLES OVER 5 TONS. Its official drawing provides the sign legend, layout, and design notes.
- R29(CA) · No Stopping/No Parking Specific Hours →
The Caltrans R29(CA) specification covers No Stopping/No Parking Specific Hours. Its official drawing provides the sign legend, layout, and design notes.
- R30(CA) · No Parking Specific Hours →
The Caltrans R30(CA) specification covers No Parking Specific Hours. Its official drawing provides the sign legend, layout, and design notes.
- R30A(CA) · No Parking Specific Hours →
The Caltrans R30A(CA) specification covers No Parking Specific Hours. Its official drawing provides the sign legend, layout, and design notes.
- R30B(CA) · No Parking 10AM TO 12PM WEDNESDAY STREET SWEEPING →
The Caltrans R30B(CA) specification covers No Parking 10AM TO 12PM WEDNESDAY STREET SWEEPING. Its official drawing provides the sign legend, layout, and design notes.
- R30C(CA) · No Parking 2AM TO 6AM EXCEPT BY PERMIT →
The Caltrans R30C(CA) specification covers No Parking 2AM TO 6AM EXCEPT BY PERMIT. Its official drawing provides the sign legend, layout, and design notes.
- R30D(CA) · No Parking 2AM TO 6AM CITYWIDE EXCEPT BY PERMIT →
The Caltrans R30D(CA) specification covers No Parking 2AM TO 6AM CITYWIDE EXCEPT BY PERMIT. Its official drawing provides the sign legend, layout, and design notes.
- R30E(CA) · No Parking w/ Double Arrow →
The Caltrans R30E(CA) specification covers No Parking w/ Double Arrow. Its official drawing provides the sign legend, layout, and design notes.
- R30F(CA) · NO STOPPING 7 TO 8 AM 2 TO 3 PM SCHOOL DAYS →
The Caltrans R30F(CA) specification covers NO STOPPING 7 TO 8 AM 2 TO 3 PM SCHOOL DAYS. Its official drawing provides the sign legend, layout, and design notes.
- R31(CA) · No Parking/Parking Specific Hours →
The Caltrans R31(CA) specification covers No Parking/Parking Specific Hours. Its official drawing provides the sign legend, layout, and design notes.
- R31(S)(CA) · No Stopping/Parking Specific Hours →
The Caltrans R31(S)(CA) specification covers No Stopping/Parking Specific Hours. Its official drawing provides the sign legend, layout, and design notes.
- R32(CA) · Limited Hour Parking Specific Hours →
The Caltrans R32(CA) specification covers Limited Hour Parking Specific Hours. Its official drawing provides the sign legend, layout, and design notes.
- R32B(CA) · No Parking/Limited Hour Parking Specific Hours →
The Caltrans R32B(CA) specification covers No Parking/Limited Hour Parking Specific Hours. Its official drawing provides the sign legend, layout, and design notes.
- R32C(CA) · 2 HOUR PARKING 8AM TO 6PM DISTRICT 7 PERMITS EXEMPT →
The Caltrans R32C(CA) specification covers 2 HOUR PARKING 8AM TO 6PM DISTRICT 7 PERMITS EXEMPT. Its official drawing provides the sign legend, layout, and design notes.
- R32D(CA) · 30 MINUTE PARKING 2AM TO 6AM DISTRICT 3 PERMITS EXEMPT →
The Caltrans R32D(CA) specification covers 30 MINUTE PARKING 2AM TO 6AM DISTRICT 3 PERMITS EXEMPT. Its official drawing provides the sign legend, layout, and design notes.
- R32E(CA) · 2 HOUR PARKING 8AM TO 4PM - PASSENGER LOADING ONLY 4PM TO MIDNIGHT 5 MINUTE LIMIT w/ Double Arrow →
The Caltrans R32E(CA) specification covers 2 HOUR PARKING 8AM TO 4PM - PASSENGER LOADING ONLY 4PM TO MIDNIGHT 5 MINUTE LIMIT w/ Double Arrow. Its official drawing provides the sign legend, layout, and design notes.
- R32F(CA) · 2 HOUR PARKING 8AM TO 6PM MOTORCYCLE PARKING ONLY w/ Double Arrow →
The Caltrans R32F(CA) specification covers 2 HOUR PARKING 8AM TO 6PM MOTORCYCLE PARKING ONLY w/ Double Arrow. Its official drawing provides the sign legend, layout, and design notes.
- R33B(CA) · No Left Turn Specific Hours EXCEPT BUSES AND HOV __+ →
The Caltrans R33B(CA) specification covers No Left Turn Specific Hours EXCEPT BUSES AND HOV __+. Its official drawing provides the sign legend, layout, and design notes.
- R33C(CA) · No Left Turn WHEN METERED EXCEPT BUSES AND HOV __+ →
The Caltrans R33C(CA) specification covers No Left Turn WHEN METERED EXCEPT BUSES AND HOV __+. Its official drawing provides the sign legend, layout, and design notes.
- R36(CA) · Commercial Vehicle Weight Exclusion →
The Caltrans R36(CA) specification covers Commercial Vehicle Weight Exclusion. Its official drawing provides the sign legend, layout, and design notes.
- R37(CA) · Tow-Away No Stopping/Limited Hour Parking Specific Hours →
The Caltrans R37(CA) specification covers Tow-Away No Stopping/Limited Hour Parking Specific Hours. Its official drawing provides the sign legend, layout, and design notes.
- R38(CA) · Tow-Away No Parking/Limited Hour Parking Specific Hours →
The Caltrans R38(CA) specification covers Tow-Away No Parking/Limited Hour Parking Specific Hours. Its official drawing provides the sign legend, layout, and design notes.
- R38(S)(CA) · Tow-Away No Stopping/Limited Hour Parking Specific Hours →
The Caltrans R38(S)(CA) specification covers Tow-Away No Stopping/Limited Hour Parking Specific Hours. Its official drawing provides the sign legend, layout, and design notes.
- R38A(CA) · TOW-AWAY NO STOPPING 7AM TO 9AM - PASSENGER LOADING ONLY ALL OTHER TIMES 5 MINUTE LIMIT w/ Double Arrow →
The Caltrans R38A(CA) specification covers TOW-AWAY NO STOPPING 7AM TO 9AM - PASSENGER LOADING ONLY ALL OTHER TIMES 5 MINUTE LIMIT w/ Double Arrow. Its official drawing provides the sign legend, layout, and design notes.
- R39(CA) · NO PARKING OF COMMERCIAL VEHICLES EXCEPT BY PERMIT →
The Caltrans R39(CA) specification covers NO PARKING OF COMMERCIAL VEHICLES EXCEPT BY PERMIT. Its official drawing provides the sign legend, layout, and design notes.
- R39-1(CA) · NO DOUBLE PARKING ANYTIME COMMERCIAL VEHICLES INCLUDED →
The Caltrans R39-1(CA) specification covers NO DOUBLE PARKING ANYTIME COMMERCIAL VEHICLES INCLUDED. Its official drawing provides the sign legend, layout, and design notes.
- R39-2(CA) · NO DOUBLE PARKING ANYTIME COMMERCIAL VEHICLES INCLUDED →
The Caltrans R39-2(CA) specification covers NO DOUBLE PARKING ANYTIME COMMERCIAL VEHICLES INCLUDED. Its official drawing provides the sign legend, layout, and design notes.
- R39-3(CA) · 10 HOUR PARKING COMMERCIAL MOTOR VEHICLES →
The Caltrans R39-3(CA) specification covers 10 HOUR PARKING COMMERCIAL MOTOR VEHICLES. Its official drawing provides the sign legend, layout, and design notes.
- R44B(CA) · BICYCLES MOTOR-DRIVEN CYCLES MUST EXIT →
The Caltrans R44B(CA) specification covers BICYCLES MOTOR-DRIVEN CYCLES MUST EXIT. Its official drawing provides the sign legend, layout, and design notes.
- R47(CA) · $1000 FINE FOR LITTERING →
The Caltrans R47(CA) specification covers $1000 FINE FOR LITTERING. Its official drawing provides the sign legend, layout, and design notes.
- R47A(CA) · $1000 FINE FOR ANIMAL ABANDONMENT →
The Caltrans R47A(CA) specification covers $1000 FINE FOR ANIMAL ABANDONMENT. Its official drawing provides the sign legend, layout, and design notes.
- R48(CA) · SPEED ENFORCED BY RADAR →
The Caltrans R48(CA) specification covers SPEED ENFORCED BY RADAR. Its official drawing provides the sign legend, layout, and design notes.
- R48-1P(CA) · RADAR ENFORCED →
The Caltrans R48-1P(CA) specification covers RADAR ENFORCED. Its official drawing provides the sign legend, layout, and design notes.
- R48-2(CA) · SPEED ENFORCED BY AIRCRAFT →
The Caltrans R48-2(CA) specification covers SPEED ENFORCED BY AIRCRAFT. Its official drawing provides the sign legend, layout, and design notes.
- R49(CA) · NO PED CROSSING, USE CROSSWALK →
The Caltrans R49(CA) specification covers NO PED CROSSING, USE CROSSWALK. Its official drawing provides the sign legend, layout, and design notes.
- R53D(CA) · AUTOS WITH TRAILERS - TRUCKS - PROHIBITED →
The Caltrans R53D(CA) specification covers AUTOS WITH TRAILERS - TRUCKS - PROHIBITED. Its official drawing provides the sign legend, layout, and design notes.
- R53E(CA) · END TRUCK LANE CONTROL →
The Caltrans R53E(CA) specification covers END TRUCK LANE CONTROL. Its official drawing provides the sign legend, layout, and design notes.
- R55(CA) · YIELD TO UPHILL TRAFFIC →
The Caltrans R55(CA) specification covers YIELD TO UPHILL TRAFFIC. Its official drawing provides the sign legend, layout, and design notes.
- R57(CA) · BEGIN FREEWAY →
The Caltrans R57(CA) specification covers BEGIN FREEWAY. Its official drawing provides the sign legend, layout, and design notes.
- R58(CA) · END FREEWAY →
The Caltrans R58(CA) specification covers END FREEWAY. Its official drawing provides the sign legend, layout, and design notes.
- R60B(CA) · Optional Movement Lane Control →
The Caltrans R60B(CA) specification covers Optional Movement Lane Control. Its official drawing provides the sign legend, layout, and design notes.
- R61-1(CA) · Intersection Lane Control →
The Caltrans R61-1(CA) specification covers Intersection Lane Control. Its official drawing provides the sign legend, layout, and design notes.
- R61-3(CA) · Intersection Lane Control →
The Caltrans R61-3(CA) specification covers Intersection Lane Control. Its official drawing provides the sign legend, layout, and design notes.
- R61-5(CA) · Intersection Lane Control →
The Caltrans R61-5(CA) specification covers Intersection Lane Control. Its official drawing provides the sign legend, layout, and design notes.
- R61-7(CA) · Intersection Lane Control →
The Caltrans R61-7(CA) specification covers Intersection Lane Control. Its official drawing provides the sign legend, layout, and design notes.
- R61-9(CA) · Intersection Lane Control →
The Caltrans R61-9(CA) specification covers Intersection Lane Control. Its official drawing provides the sign legend, layout, and design notes.
- R61-11(CA) · Intersection Lane Control →
The Caltrans R61-11(CA) specification covers Intersection Lane Control. Its official drawing provides the sign legend, layout, and design notes.
- R61-13(CA) · Intersection Lane Control →
The Caltrans R61-13(CA) specification covers Intersection Lane Control. Its official drawing provides the sign legend, layout, and design notes.
- R61-15(CA) · Intersection Lane Control →
The Caltrans R61-15(CA) specification covers Intersection Lane Control. Its official drawing provides the sign legend, layout, and design notes.
- R61-17(CA) · Intersection Lane Control →
The Caltrans R61-17(CA) specification covers Intersection Lane Control. Its official drawing provides the sign legend, layout, and design notes.
- R61-19(CA) · Intersection Lane Control →
The Caltrans R61-19(CA) specification covers Intersection Lane Control. Its official drawing provides the sign legend, layout, and design notes.
- R61-22(CA) · Intersection Lane Control →
The Caltrans R61-22(CA) specification covers Intersection Lane Control. Its official drawing provides the sign legend, layout, and design notes.
- R61-24(CA) · Intersection Lane Control →
The Caltrans R61-24(CA) specification covers Intersection Lane Control. Its official drawing provides the sign legend, layout, and design notes.
- R61-26(CA) · Intersection Lane Control →
The Caltrans R61-26(CA) specification covers Intersection Lane Control. Its official drawing provides the sign legend, layout, and design notes.
- R61-28(CA) · Intersection Lane Control →
The Caltrans R61-28(CA) specification covers Intersection Lane Control. Its official drawing provides the sign legend, layout, and design notes.
- R61-30(CA) · Intersection Lane Control →
The Caltrans R61-30(CA) specification covers Intersection Lane Control. Its official drawing provides the sign legend, layout, and design notes.
- R61-32(CA) · Intersection Lane Control →
The Caltrans R61-32(CA) specification covers Intersection Lane Control. Its official drawing provides the sign legend, layout, and design notes.
- R61-34(CA) · Intersection Lane Control →
The Caltrans R61-34(CA) specification covers Intersection Lane Control. Its official drawing provides the sign legend, layout, and design notes.
- R61-36(CA) · Intersection Lane Control →
The Caltrans R61-36(CA) specification covers Intersection Lane Control. Its official drawing provides the sign legend, layout, and design notes.
- R70(CA) · TRUCKS OK →
The Caltrans R70(CA) specification covers TRUCKS OK. Its official drawing provides the sign legend, layout, and design notes.
- R70A(CA) · TRUCKS (upper panel) →
The Caltrans R70A(CA) specification covers TRUCKS (upper panel). Its official drawing provides the sign legend, layout, and design notes.
- R70B(CA) · OK (lower panel) →
The Caltrans R70B(CA) specification covers OK (lower panel). Its official drawing provides the sign legend, layout, and design notes.
- R73-1(CA) · Intersection Lane Control →
The Caltrans R73-1(CA) specification covers Intersection Lane Control. Its official drawing provides the sign legend, layout, and design notes.
- R73-2(CA) · Intersection Lane Control →
The Caltrans R73-2(CA) specification covers Intersection Lane Control. Its official drawing provides the sign legend, layout, and design notes.
- R73-3(CA) · Intersection Lane Control →
The Caltrans R73-3(CA) specification covers Intersection Lane Control. Its official drawing provides the sign legend, layout, and design notes.
- R73-4(CA) · Intersection Lane Control →
The Caltrans R73-4(CA) specification covers Intersection Lane Control. Its official drawing provides the sign legend, layout, and design notes.
- R73-5(CA) · Intersection Lane Control →
The Caltrans R73-5(CA) specification covers Intersection Lane Control. Its official drawing provides the sign legend, layout, and design notes.
- R73-6(CA) · Intersection Lane Control →
The Caltrans R73-6(CA) specification covers Intersection Lane Control. Its official drawing provides the sign legend, layout, and design notes.
- R73-8(CA) · Intersection Lane Control →
The Caltrans R73-8(CA) specification covers Intersection Lane Control. Its official drawing provides the sign legend, layout, and design notes.
- R74(CA) · CHAIN INSTALLATION ONLY →
The Caltrans R74(CA) specification covers CHAIN INSTALLATION ONLY. Its official drawing provides the sign legend, layout, and design notes.
- R75(CA) · CHAINS REQUIRED (X MILE (X MILES)) AHEAD →
The Caltrans R75(CA) specification covers CHAINS REQUIRED (X MILE (X MILES)) AHEAD. Its official drawing provides the sign legend, layout, and design notes.
- R76(CA) · CHAINS REQUIRED →
The Caltrans R76(CA) specification covers CHAINS REQUIRED. Its official drawing provides the sign legend, layout, and design notes.
- R76-1(CA) · ON SINGLE AXLE DRIVE VEHICLE WITH TRAILER →
The Caltrans R76-1(CA) specification covers ON SINGLE AXLE DRIVE VEHICLE WITH TRAILER. Its official drawing provides the sign legend, layout, and design notes.
- R77(CA) · NO EXCEPTIONS →
The Caltrans R77(CA) specification covers NO EXCEPTIONS. Its official drawing provides the sign legend, layout, and design notes.
- R78(CA) · END CHAIN CONTROL →
The Caltrans R78(CA) specification covers END CHAIN CONTROL. Its official drawing provides the sign legend, layout, and design notes.
- R79(CA) · AUTOS & PICKUPS SNOW TIRES OK - CARRY CHAINS →
The Caltrans R79(CA) specification covers AUTOS & PICKUPS SNOW TIRES OK - CARRY CHAINS. Its official drawing provides the sign legend, layout, and design notes.
- R80-1(CA) · 4-W DRIVE WITH SNOW TIRES OK - CARRY CHAINS →
The Caltrans R80-1(CA) specification covers 4-W DRIVE WITH SNOW TIRES OK - CARRY CHAINS. Its official drawing provides the sign legend, layout, and design notes.
- R82AP(CA) · Specific Hours/Days Plaque →
The Caltrans R82AP(CA) specification covers Specific Hours/Days Plaque. Its official drawing provides the sign legend, layout, and design notes.
- R82BP(CA) · Specific Hours/Days Plaque →
The Caltrans R82BP(CA) specification covers Specific Hours/Days Plaque. Its official drawing provides the sign legend, layout, and design notes.
- R88(CA) · LEFT (CENTER OR RIGHT) LANE DO NOT STOP (BUSES ONLY) →
The Caltrans R88(CA) specification covers LEFT (CENTER OR RIGHT) LANE DO NOT STOP (BUSES ONLY). Its official drawing provides the sign legend, layout, and design notes.
- R90-1(CA) · ALL VEHICLES STOP ON RED →
The Caltrans R90-1(CA) specification covers ALL VEHICLES STOP ON RED. Its official drawing provides the sign legend, layout, and design notes.
- R91-1(CA) · LEFT (CENTER OR RIGHT) LANE HOV___+ ___ OR MORE ONLY WHEN METERED (24 HOURS) →
The Caltrans R91-1(CA) specification covers LEFT (CENTER OR RIGHT) LANE HOV___+ ___ OR MORE ONLY WHEN METERED (24 HOURS). Its official drawing provides the sign legend, layout, and design notes.
- R91-4(CA) · (HOV) NO TRUCKS 3 AXLES OR MORE - NO VEHICLES WITH TRAILERS →
The Caltrans R91-4(CA) specification covers (HOV) NO TRUCKS 3 AXLES OR MORE - NO VEHICLES WITH TRAILERS. Its official drawing provides the sign legend, layout, and design notes.
- R91BP(CA) · AUTOS/PICKUPS 2 SEATERS WITH 2 PERSONS OK →
The Caltrans R91BP(CA) specification covers AUTOS/PICKUPS 2 SEATERS WITH 2 PERSONS OK. Its official drawing provides the sign legend, layout, and design notes.
- R94 LT(CA) · Mandatory/Optional HOV Movement Lane Control →
The Caltrans R94 LT(CA) specification covers Mandatory/Optional HOV Movement Lane Control. Its official drawing provides the sign legend, layout, and design notes.
- R94 RT(CA) · Mandatory/Optional HOV Movement Lane Control →
The Caltrans R94 RT(CA) specification covers Mandatory/Optional HOV Movement Lane Control. Its official drawing provides the sign legend, layout, and design notes.
- R99(CA) · Accessible Parking Only →
The Caltrans R99(CA) specification covers Accessible Parking Only. Its official drawing provides the sign legend, layout, and design notes.
- R99B(CA) · MINIMUM FINE $250 (plaque) →
The Caltrans R99B(CA) specification covers MINIMUM FINE $250 (plaque). Its official drawing provides the sign legend, layout, and design notes.
- R99C(CA) · Accessible Parking Only — Minimum Fine $250 (California) →
Reserves a parking space for persons with disabilities displaying a valid disabled-person placard or license plate, and advises that violations carry a minimum fine of $250 under the California Vehicle Code. The legend combines the International Symbol of Accessibility with PARKING ONLY and a MINIMUM FINE $250 panel. Official depiction: Caltrans Sign Specifications drawing R99C (CA), dated 7/1/08 — 12" × 24" with blue retroreflective background and white retroreflective border and legend. This is a California-only sign with no direct federal MUTCD equivalent.
- R100A(CA) · TOW-AWAY SPECIAL PLACARD OR LICENSE PLATE REQUIRED →
The Caltrans R100A(CA) specification covers TOW-AWAY SPECIAL PLACARD OR LICENSE PLATE REQUIRED. Its official drawing provides the sign legend, layout, and design notes.
- R100B(CA) · Disabled Tow-Away →
The Caltrans R100B(CA) specification covers Disabled Tow-Away. Its official drawing provides the sign legend, layout, and design notes.
- R101(CA) · PRIVATE ROAD (PRIVATE PROPERTY) VEHICLE CODE ENFORCED →
The Caltrans R101(CA) specification covers PRIVATE ROAD (PRIVATE PROPERTY) VEHICLE CODE ENFORCED. Its official drawing provides the sign legend, layout, and design notes.
- R102AP(CA) · HAZARDOUS WASTE PROHIBITED →
The Caltrans R102AP(CA) specification covers HAZARDOUS WASTE PROHIBITED. Its official drawing provides the sign legend, layout, and design notes.
- R103AP(CA) · HAZARDOUS WASTE PERMITTED →
The Caltrans R103AP(CA) specification covers HAZARDOUS WASTE PERMITTED. Its official drawing provides the sign legend, layout, and design notes.
- R104AP(CA) · HAZARDOUS MATERIAL PROHIBITED →
The Caltrans R104AP(CA) specification covers HAZARDOUS MATERIAL PROHIBITED. Its official drawing provides the sign legend, layout, and design notes.
- R105AP(CA) · HAZARDOUS MATERIAL PERMITTED →
The Caltrans R105AP(CA) specification covers HAZARDOUS MATERIAL PERMITTED. Its official drawing provides the sign legend, layout, and design notes.
- R107(CA) · Tow-Away NO STOPPING 4 TO 6 PM →
The Caltrans R107(CA) specification covers Tow-Away NO STOPPING 4 TO 6 PM. Its official drawing provides the sign legend, layout, and design notes.
- R108(CA) · No Parking of Vehicles for Sale →
The Caltrans R108(CA) specification covers No Parking of Vehicles for Sale. Its official drawing provides the sign legend, layout, and design notes.
- R109P(CA) · PAY AT STATION →
The Caltrans R109P(CA) specification covers PAY AT STATION. Its official drawing provides the sign legend, layout, and design notes.
- R111(CA) · MOVE OVER OR SLOW WHEN AMBER LIGHTS FLASHING →
The Caltrans R111(CA) specification covers MOVE OVER OR SLOW WHEN AMBER LIGHTS FLASHING. Its official drawing provides the sign legend, layout, and design notes.
- R112(CA) · Electric Vehicle Charging Station Tow-Away →
The Caltrans R112(CA) specification covers Electric Vehicle Charging Station Tow-Away. Its official drawing provides the sign legend, layout, and design notes.
- R113(CA) · No Parking (symbol) EXCEPT FOR EV CHARGING →
The Caltrans R113(CA) specification covers No Parking (symbol) EXCEPT FOR EV CHARGING. Its official drawing provides the sign legend, layout, and design notes.
- R113A(CA) · No Parking (symbol) EXCEPT FOR ELECTRIC VEHICLE CHARGING →
The Caltrans R113A(CA) specification covers No Parking (symbol) EXCEPT FOR ELECTRIC VEHICLE CHARGING. Its official drawing provides the sign legend, layout, and design notes.
- R114(CA) · __HOUR EV CHARGING - __AM TO __PM →
The Caltrans R114(CA) specification covers __HOUR EV CHARGING - __AM TO __PM. Its official drawing provides the sign legend, layout, and design notes.
- R114A(CA) · __HOUR ELECTRIC VEHICLE CHARGING - __AM TO __PM →
The Caltrans R114A(CA) specification covers __HOUR ELECTRIC VEHICLE CHARGING - __AM TO __PM. Its official drawing provides the sign legend, layout, and design notes.
- R116(CA) · ALT FUEL VEHICLE PARKING ONLY →
The Caltrans R116(CA) specification covers ALT FUEL VEHICLE PARKING ONLY. Its official drawing provides the sign legend, layout, and design notes.
- R119(CA) · NO CAMPING OR SLEEPING IN VEHICLE →
The Caltrans R119(CA) specification covers NO CAMPING OR SLEEPING IN VEHICLE. Its official drawing provides the sign legend, layout, and design notes.
- S21P(CA) · Weigh Station Repair Service Plaque →
The Caltrans S21P(CA) specification covers Weigh Station Repair Service Plaque. Its official drawing provides the sign legend, layout, and design notes.
- S22(CA) · NO LOITERING, CAMPING, VENDING OR PARKING OF VEHICLES 30 FEET OR LONGER →
The Caltrans S22(CA) specification covers NO LOITERING, CAMPING, VENDING OR PARKING OF VEHICLES 30 FEET OR LONGER. Its official drawing provides the sign legend, layout, and design notes.
- S22-1(CA) · VEHICLE INSPECTION ONLY, NO LOITERING OR CAMPING →
The Caltrans S22-1(CA) specification covers VEHICLE INSPECTION ONLY, NO LOITERING OR CAMPING. Its official drawing provides the sign legend, layout, and design notes.
- S23(CA) · Rest Area/Vista Point 8 HOUR PARKING →
The Caltrans S23(CA) specification covers Rest Area/Vista Point 8 HOUR PARKING. Its official drawing provides the sign legend, layout, and design notes.
- S24(CA) · NO SOLICITING →
The Caltrans S24(CA) specification covers NO SOLICITING. Its official drawing provides the sign legend, layout, and design notes.
- S34(CA) · Highway Patrol PARKING ONLY →
The Caltrans S34(CA) specification covers Highway Patrol PARKING ONLY. Its official drawing provides the sign legend, layout, and design notes.
- SR2(CA) · Rest Area Disclaimer →
The Caltrans SR2(CA) specification covers Rest Area Disclaimer. Its official drawing provides the sign legend, layout, and design notes.
- SR4-1(CA) · School Speed Limit Assembly C (CA) →
The Caltrans SR4-1(CA) specification covers School Speed Limit Assembly C (CA). Its official drawing provides the sign legend, layout, and design notes.
- SR6-1(CA) · WAIT HERE UNTIL SCALE CLEAR →
The Caltrans SR6-1(CA) specification covers WAIT HERE UNTIL SCALE CLEAR. Its official drawing provides the sign legend, layout, and design notes.
- SR7-1(CA) · RELEASE BRAKES WHILE ON SCALE →
The Caltrans SR7-1(CA) specification covers RELEASE BRAKES WHILE ON SCALE. Its official drawing provides the sign legend, layout, and design notes.
- SR8-1(CA) · SET PARKING BRAKES →
The Caltrans SR8-1(CA) specification covers SET PARKING BRAKES. Its official drawing provides the sign legend, layout, and design notes.
- SR9-1(CA) · LOADED →
The Caltrans SR9-1(CA) specification covers LOADED. Its official drawing provides the sign legend, layout, and design notes.
- SR10-1(CA) · EMPTY →
The Caltrans SR10-1(CA) specification covers EMPTY. Its official drawing provides the sign legend, layout, and design notes.
- SR11-1(CA) · EMPTY 5 MPH →
The Caltrans SR11-1(CA) specification covers EMPTY 5 MPH. Its official drawing provides the sign legend, layout, and design notes.
- SR12-1(CA) · LOADED 3 MPH →
The Caltrans SR12-1(CA) specification covers LOADED 3 MPH. Its official drawing provides the sign legend, layout, and design notes.
- SR13-1P(CA) · Theft CHP Plaque →
The Caltrans SR13-1P(CA) specification covers Theft CHP Plaque. Its official drawing provides the sign legend, layout, and design notes.
- SR15(CA) · Seat Belt →
The Caltrans SR15(CA) specification covers Seat Belt. Its official drawing provides the sign legend, layout, and design notes.
- SR15AP(CA) · SAFETY BELT LAW ENFORCED →
The Caltrans SR15AP(CA) specification covers SAFETY BELT LAW ENFORCED. Its official drawing provides the sign legend, layout, and design notes.
- SR17(CA) · TRUCKS NOT GIVEN BYPASS SIGNAL MUST ENTER OPEN SCALES →
The Caltrans SR17(CA) specification covers TRUCKS NOT GIVEN BYPASS SIGNAL MUST ENTER OPEN SCALES. Its official drawing provides the sign legend, layout, and design notes.
- SR18(CA) · NO EXPLOSIVES OR FLAMMABLES →
The Caltrans SR18(CA) specification covers NO EXPLOSIVES OR FLAMMABLES. Its official drawing provides the sign legend, layout, and design notes.
- SR19-1(CA) · EXPLOSIVES AND CORROSIVES PROHIBITED WITHOUT PERMIT →
The Caltrans SR19-1(CA) specification covers EXPLOSIVES AND CORROSIVES PROHIBITED WITHOUT PERMIT. Its official drawing provides the sign legend, layout, and design notes.
- SR20-1(CA) · SNOW NOT REMOVED BEYOND HERE →
The Caltrans SR20-1(CA) specification covers SNOW NOT REMOVED BEYOND HERE. Its official drawing provides the sign legend, layout, and design notes.
- SR22-1(CA) · DUMPING PROHIBITED →
The Caltrans SR22-1(CA) specification covers DUMPING PROHIBITED. Its official drawing provides the sign legend, layout, and design notes.
- SR23-1(CA) · NO HOUSEHOLD GARBAGE →
The Caltrans SR23-1(CA) specification covers NO HOUSEHOLD GARBAGE. Its official drawing provides the sign legend, layout, and design notes.
- SR25(CA) · TRANSPORTING ILLEGAL FIREWORKS PROHIBITED →
The Caltrans SR25(CA) specification covers TRANSPORTING ILLEGAL FIREWORKS PROHIBITED. Its official drawing provides the sign legend, layout, and design notes.
- SR26(CA) · DISPLAY OF VEHICLES FOR SALE PROHIBITED →
The Caltrans SR26(CA) specification covers DISPLAY OF VEHICLES FOR SALE PROHIBITED. Its official drawing provides the sign legend, layout, and design notes.
- SR39A(U)(CA) · LEFT OR U TURN ON GREEN ARROW ONLY →
The Caltrans SR39A(U)(CA) specification covers LEFT OR U TURN ON GREEN ARROW ONLY. Its official drawing provides the sign legend, layout, and design notes.
- SR40(CA) · Width Limit →
The Caltrans SR40(CA) specification covers Width Limit. Its official drawing provides the sign legend, layout, and design notes.
- SR42(CA) · ALL BUSES with Arrow →
The Caltrans SR42(CA) specification covers ALL BUSES with Arrow. Its official drawing provides the sign legend, layout, and design notes.
- SR43(CA) · GOLF CARTS OK DAYLIGHT HOURS →
The Caltrans SR43(CA) specification covers GOLF CARTS OK DAYLIGHT HOURS. Its official drawing provides the sign legend, layout, and design notes.
- SR44(CA) · Bus and Truck Registration →
The Caltrans SR44(CA) specification covers Bus and Truck Registration. Its official drawing provides the sign legend, layout, and design notes.
- SR46(CA) · EMERGENCY ACCESS KEEP CLEAR →
The Caltrans SR46(CA) specification covers EMERGENCY ACCESS KEEP CLEAR. Its official drawing provides the sign legend, layout, and design notes.
- SR47(CA) · OFF HIGHWAY VEHICLES COMBINED USE NEXT (X) MILES →
The Caltrans SR47(CA) specification covers OFF HIGHWAY VEHICLES COMBINED USE NEXT (X) MILES. Its official drawing provides the sign legend, layout, and design notes.
- SR48(CA) · NO OFF HIGHWAY VEHICLES BEYOND THIS POINT →
The Caltrans SR48(CA) specification covers NO OFF HIGHWAY VEHICLES BEYOND THIS POINT. Its official drawing provides the sign legend, layout, and design notes.
- SR49(CA) · TOW-AWAY NO PARKING WHEN SNOW REMOVAL CONDITIONS EXIST →
The Caltrans SR49(CA) specification covers TOW-AWAY NO PARKING WHEN SNOW REMOVAL CONDITIONS EXIST. Its official drawing provides the sign legend, layout, and design notes.
- SR50-1(CA) · HOV VIOLATION $___ MINIMUM FINE →
The Caltrans SR50-1(CA) specification covers HOV VIOLATION $___ MINIMUM FINE. Its official drawing provides the sign legend, layout, and design notes.
- SR50-2(CA) · HOV VIOLATION $___ MINIMUM FINE →
The Caltrans SR50-2(CA) specification covers HOV VIOLATION $___ MINIMUM FINE. Its official drawing provides the sign legend, layout, and design notes.
- SR53(CA) · SPECIAL DRIVING ZONE BEGINS HERE - DOUBLE FINE ZONE →
The Caltrans SR53(CA) specification covers SPECIAL DRIVING ZONE BEGINS HERE - DOUBLE FINE ZONE. Its official drawing provides the sign legend, layout, and design notes.
- SR54(CA) · DOUBLE FINE ZONE →
The Caltrans SR54(CA) specification covers DOUBLE FINE ZONE. Its official drawing provides the sign legend, layout, and design notes.
- SR55(CA) · SPECIAL DRIVING ZONE ENDS HERE →
The Caltrans SR55(CA) specification covers SPECIAL DRIVING ZONE ENDS HERE. Its official drawing provides the sign legend, layout, and design notes.
- SR58(CA) · RED LIGHT VIOLATION $____ MINIMUM FINE →
The Caltrans SR58(CA) specification covers RED LIGHT VIOLATION $____ MINIMUM FINE. Its official drawing provides the sign legend, layout, and design notes.
- SR60-1(CA) · RIGHT LANE BUS LANE AHEAD →
The Caltrans SR60-1(CA) specification covers RIGHT LANE BUS LANE AHEAD. Its official drawing provides the sign legend, layout, and design notes.
- SR60-2(CA) · RIGHT LANE BUS LANE AHEAD ON X ST. →
The Caltrans SR60-2(CA) specification covers RIGHT LANE BUS LANE AHEAD ON X ST.. Its official drawing provides the sign legend, layout, and design notes.
- SR60-4(CA) · RIGHT LANE BUSES TAXIS ONLY 24 HOURS →
The Caltrans SR60-4(CA) specification covers RIGHT LANE BUSES TAXIS ONLY 24 HOURS. Its official drawing provides the sign legend, layout, and design notes.
- SR60-6(CA) · RIGHT LANE TRAINS RIGHT TURNS ONLY 24 HOURS →
The Caltrans SR60-6(CA) specification covers RIGHT LANE TRAINS RIGHT TURNS ONLY 24 HOURS. Its official drawing provides the sign legend, layout, and design notes.
- SR60-8(CA) · RIGHT LANE BUSES TAXIS ONLY 6AM - 9PM MON – FRI w/Downward Arrow →
The Caltrans SR60-8(CA) specification covers RIGHT LANE BUSES TAXIS ONLY 6AM - 9PM MON – FRI w/Downward Arrow. Its official drawing provides the sign legend, layout, and design notes.
- SR62(CA) · NO IDLING COMMERCIAL VEHICLES AND ALL BUSES →
The Caltrans SR62(CA) specification covers NO IDLING COMMERCIAL VEHICLES AND ALL BUSES. Its official drawing provides the sign legend, layout, and design notes.
- SR63(CA) · NO IDLING All Buses and Commercial Vehicles →
The Caltrans SR63(CA) specification covers NO IDLING All Buses and Commercial Vehicles. Its official drawing provides the sign legend, layout, and design notes.
- SR63A(CA) · NO IDLING All Buses and Commercial Vehicles REPORT VIOLATIONS →
The Caltrans SR63A(CA) specification covers NO IDLING All Buses and Commercial Vehicles REPORT VIOLATIONS. Its official drawing provides the sign legend, layout, and design notes.
- SR64A(CA) · BIKE TURN-OUT XX FT →
The Caltrans SR64A(CA) specification covers BIKE TURN-OUT XX FT. Its official drawing provides the sign legend, layout, and design notes.
- SR64B(CA) · BIKE TURN-OUT (with arrow) →
The Caltrans SR64B(CA) specification covers BIKE TURN-OUT (with arrow). Its official drawing provides the sign legend, layout, and design notes.
- OM1-1 · Object Marker Type 1 →
A Type 1 object marker using yellow reflectors on a yellow diamond-shaped panel to mark an obstruction. It highlights the object's location rather than giving a travel direction.
- OM1-2 · Object Marker Type 1 →
A Type 1 object marker using yellow reflectors on a black diamond-shaped panel to mark an obstruction. It makes the object's location conspicuous to approaching traffic.
- OM1-3 · Object Marker (Type 1) →
A Type 1 object marker with a solid yellow diamond-shaped face. It identifies an obstruction within or adjacent to the roadway; it has no directional stripes.
- OM2-1H · Object Marker Type 2 →
A horizontal Type 2 object marker with three yellow reflectors. It marks an object adjacent to the roadway using the horizontal reflector arrangement.
- OM2-1V · Object Marker Type 2 →
A vertical Type 2 object marker with three yellow reflectors. It marks an object adjacent to the roadway, such as the end of a structure or roadside obstruction.
- OM2-2H · Object Marker Type 2 →
A horizontal Type 2 object marker with a solid yellow retroreflective face. It identifies an object adjacent to the roadway.
- OM2-2V · Object Marker (Type 2, Vertical) →
A vertical Type 2 object marker with a solid yellow face. It identifies an object adjacent to the roadway and has no diagonal stripes.
- OM3-C · Object Marker Type 3 →
A Type 3 object marker with a central chevron arrangement. The downward-sloping stripes identify an obstruction that traffic can pass on either side.
- OM3-L · Object Marker (Type 3) →
A Type 3 object marker whose black-and-yellow stripes slope downward toward the right. It marks an obstruction on the left side of the path that traffic follows past the object.
- OM3-R · Object Marker Type 3 →
A Type 3 object marker whose diagonal black-and-yellow stripes slope downward toward the left. The stripe direction identifies the side on which traffic should pass the obstruction.
- OM4-1 · Object Marker Type 4 →
An end-of-roadway marker using red reflectors on a red diamond-shaped panel. It marks a roadway termination beyond which traffic should not continue.
- OM4-2 · Object Marker Type 4 →
An end-of-roadway marker using red reflectors on a black diamond-shaped panel. It identifies the end of the traveled roadway.
- OM4-3 · Object Marker Type 4 →
An end-of-roadway marker with a solid red retroreflective diamond-shaped face. It identifies a roadway termination rather than a passable roadside object.
- S26(CA) · Rattlesnakes Caution →
The Caltrans S26(CA) specification covers Rattlesnakes Caution. Its official drawing provides the sign legend, layout, and design notes.
- SW4-1(CA) · WATCH DOWNHILL SPEED →
The Caltrans SW4-1(CA) specification covers WATCH DOWNHILL SPEED. Its official drawing provides the sign legend, layout, and design notes.
- SW24-1(CA) · School Crosswalk Warning Assembly A (CA) →
The Caltrans SW24-1(CA) specification covers School Crosswalk Warning Assembly A (CA). Its official drawing provides the sign legend, layout, and design notes.
- SW24-2(CA) · School Crosswalk Warning Assembly B (CA) →
The Caltrans SW24-2(CA) specification covers School Crosswalk Warning Assembly B (CA). Its official drawing provides the sign legend, layout, and design notes.
- SW24-3(CA) · School Advance Warning Assembly D (CA) →
The Caltrans SW24-3(CA) specification covers School Advance Warning Assembly D (CA). Its official drawing provides the sign legend, layout, and design notes.
- SW32(CA) · DRIFTING SAND →
The Caltrans SW32(CA) specification covers DRIFTING SAND. Its official drawing provides the sign legend, layout, and design notes.
- SW35(CA) · FLASH FLOOD AREA →
The Caltrans SW35(CA) specification covers FLASH FLOOD AREA. Its official drawing provides the sign legend, layout, and design notes.
- SW37(CA) · TUNNEL →
The Caltrans SW37(CA) specification covers TUNNEL. Its official drawing provides the sign legend, layout, and design notes.
- SW38(CA) · DEAF CHILDREN NEAR →
The Caltrans SW38(CA) specification covers DEAF CHILDREN NEAR. Its official drawing provides the sign legend, layout, and design notes.
- SW41(CA) · SNOW SLIDE AREA →
The Caltrans SW41(CA) specification covers SNOW SLIDE AREA. Its official drawing provides the sign legend, layout, and design notes.
- SW48(CA) · TRACTOR-SEMIS OVER (X FEET) KINGPIN TO REAR AXLE NOT ADVISED →
The Caltrans SW48(CA) specification covers TRACTOR-SEMIS OVER (X FEET) KINGPIN TO REAR AXLE NOT ADVISED. Its official drawing provides the sign legend, layout, and design notes.
- SW48-1P(CA) · NEXT RIGHT →
The Caltrans SW48-1P(CA) specification covers NEXT RIGHT. Its official drawing provides the sign legend, layout, and design notes.
- SW49P(CA) · PLAYGROUND →
The Caltrans SW49P(CA) specification covers PLAYGROUND. Its official drawing provides the sign legend, layout, and design notes.
- SW58(CA) · WATCH FOR SNOW REMOVAL EQUIPMENT →
The Caltrans SW58(CA) specification covers WATCH FOR SNOW REMOVAL EQUIPMENT. Its official drawing provides the sign legend, layout, and design notes.
- W1-3L · Reverse Turn (Left) →
The W1-3L Reverse Turn (Left) sign warns of two turns in opposite directions that are separated by a short tangent, where the first turn is to the left. The angular symbol distinguishes a reverse turn from the smoother reverse curve (W1-4).
- W1-3R · Reverse Turn (Right) →
The W1-3R Reverse Turn (Right) sign warns of two turns in opposite directions that are separated by a short tangent, where the first turn is to the right. The angular symbol distinguishes a reverse turn from the smoother reverse curve (W1-4).
- W1-6L · One Direction Large Arrow (Left) →
The W1-6L One Direction Large Arrow (Left) sign is a horizontal warning sign with a single large arrow that directs traffic to turn or bear left at a sharp change in roadway alignment. It is mounted on the outside of the curve or turn, facing approaching drivers, so the arrow points in the direction the road goes.
- W1-6R · One Direction Large Arrow (Right) →
The W1-6R One Direction Large Arrow (Right) sign is a horizontal warning sign with a single large arrow that directs traffic to turn or bear right at a sharp change in roadway alignment. It is mounted on the outside of the curve or turn, facing approaching drivers, so the arrow points in the direction the road goes.
- W3-1 · Stop Ahead →
Warns that a STOP-controlled location is ahead. The upward arrow and stop-sign symbol give advance notice to prepare to stop at the upcoming control.
- W3-2 · Yield Ahead →
Warns that a YIELD-controlled location is ahead. The upward arrow and yield-sign symbol give advance notice of the upcoming yield control.
- W3-5a · XX MPH Speed Zone Ahead →
Warns of a speed zone ahead and displays that zone's speed in miles per hour. The warning gives advance notice; the regulatory speed-limit sign identifies the applicable limit at the zone.
- W5-1 · Road Narrows →
Warns that the roadway becomes narrower ahead. The message concerns reduced roadway width and does not identify a particular lane as ending.
- W5-2 · Narrow Bridge →
Warns that the bridge ahead has a narrow roadway. Drivers should prepare for less lateral clearance while crossing the bridge.
- W5-3 · One Lane Bridge →
Warns that a bridge ahead has room for only one traffic lane. Opposing road users may need to wait rather than enter the bridge at the same time.
- W6-1 · Divided Highway →
Warns that a divided highway begins ahead. The symbol shows opposing directions separating around a median or other physical divider.
- W6-2 · Divided Highway Ends →
Warns that a divided highway ends ahead. The symbol shows opposing directions continuing beyond the end of the physical divider.
- W6-3 · Two-Way Traffic →
Warns of two-way traffic ahead. Its opposed arrows alert drivers that vehicles can approach in the opposite direction on the roadway.
- W7-1 · Hill →
Warns of a steep downgrade ahead. The truck-on-slope symbol calls attention to the hill and the need to control speed on the descent.
- W8-1 · Bump →
Warns of a bump or abrupt raised irregularity in the roadway ahead. Drivers should adjust speed before crossing the surface change.
- W8-2 · Dip →
Warns of a dip or abrupt depression in the roadway ahead. Drivers should adjust speed before crossing the low point.
- W8-3 · Pavement Ends →
Warns that the paved surface ends ahead. Drivers should prepare for the transition to an unpaved roadway surface.
- W8-5 · Slippery When Wet →
Warns that the roadway can become slippery when wet. The skidding-vehicle symbol calls attention to reduced traction under wet conditions.
- W9-1 · Right (Left) Lane Ends →
Warns that the named right or left lane ends ahead. The word message identifies which lane is ending so drivers can prepare for the lane reduction.
- W11-1 · Bicycle →
Warns of bicycle activity or a bicycle crossing. Supplemental plaques, where used, distinguish an advance warning from the location of the crossing.
- W11-1(CA) · (HOV) Lane Reduction →
The Caltrans W11-1(CA) specification covers (HOV) Lane Reduction. Its official drawing provides the sign legend, layout, and design notes.
- W11-2 · Pedestrian →
Warns of pedestrian activity or a pedestrian crossing. Supplemental plaques, where used, identify the crossing location or provide advance notice.
- W11-8 · Emergency Vehicle →
Warns that emergency vehicles can enter the roadway ahead. The emergency-vehicle symbol calls attention to the potential crossing or entry movement.
- W11-9 · Pedestrian with Disability (Wheelchair Symbol) →
Uses a wheelchair symbol to warn drivers of a crossing used by people with disabilities. This warning sign is distinct from blue accessibility guide signs and reserved-parking signs.
- W11-23(CA) · WILDLIFE CROSSING →
The Caltrans W11-23(CA) specification covers WILDLIFE CROSSING. Its official drawing provides the sign legend, layout, and design notes.
- W12-1 · Double Arrow →
Marks an obstruction or island that traffic can pass on either side. The two downward diagonal arrows identify the available sides of passage.
- W13-2 · Advisory Exit Speed →
Displays an advisory speed for an exit. The value advises drivers about the exit maneuver and is distinct from a regulatory speed-limit posting.
- W17-1 · Speed Hump →
Warns of a speed hump ahead. It identifies an intentional raised traffic-calming feature so drivers can adjust speed before reaching it.
- W20A(CA) · Weight Limit →
The Caltrans W20A(CA) specification covers Weight Limit. Its official drawing provides the sign legend, layout, and design notes.
- W23-2 · New Traffic Pattern Ahead →
Warns that the traffic pattern ahead has changed. Drivers should watch for unfamiliar lane paths or movements rather than rely on the previous arrangement.
- W26-1 · Watch for Stopped Traffic →
Warns drivers to watch for stopped traffic ahead. It calls attention to a queue that may extend beyond the immediately visible work or congestion area.
- W30B(CA) · DEEP GRAVEL →
The Caltrans W30B(CA) specification covers DEEP GRAVEL. Its official drawing provides the sign legend, layout, and design notes.
- W30CP(CA) · RIGHT (LEFT) EXIT plaque →
The Caltrans W30CP(CA) specification covers RIGHT (LEFT) EXIT plaque. Its official drawing provides the sign legend, layout, and design notes.
- W31(CA) · END →
The Caltrans W31(CA) specification covers END. Its official drawing provides the sign legend, layout, and design notes.
- W34C(CA) · CAUTION VERTICAL CLEARANCE ___' ___" Arrow →
The Caltrans W34C(CA) specification covers CAUTION VERTICAL CLEARANCE ___' ___" Arrow. Its official drawing provides the sign legend, layout, and design notes.
- W38(CA) · SLIDE AREA →
The Caltrans W38(CA) specification covers SLIDE AREA. Its official drawing provides the sign legend, layout, and design notes.
- W44AP(CA) · TWO WAY TRAFFIC Plaque →
The Caltrans W44AP(CA) specification covers TWO WAY TRAFFIC Plaque. Its official drawing provides the sign legend, layout, and design notes.
- W46AP(CA) · EXEMPT 2W-5.1-C (plaque) →
The Caltrans W46AP(CA) specification covers EXEMPT 2W-5.1-C (plaque). Its official drawing provides the sign legend, layout, and design notes.
- W48P(CA) · Number of Tracks (plaque) →
The Caltrans W48P(CA) specification covers Number of Tracks (plaque). Its official drawing provides the sign legend, layout, and design notes.
- W51(CA) · SLOW TRUCKS →
The Caltrans W51(CA) specification covers SLOW TRUCKS. Its official drawing provides the sign legend, layout, and design notes.
- W55(CA) · FLOODED →
The Caltrans W55(CA) specification covers FLOODED. Its official drawing provides the sign legend, layout, and design notes.
- W59-1(CA) · (HOV) Merge →
The Caltrans W59-1(CA) specification covers (HOV) Merge. Its official drawing provides the sign legend, layout, and design notes.
- W70(CA) · CROSS TRAFFIC AHEAD →
The Caltrans W70(CA) specification covers CROSS TRAFFIC AHEAD. Its official drawing provides the sign legend, layout, and design notes.
- W72B(CA) · (HOV) Advisory Exit (Ramp) Speed →
The Caltrans W72B(CA) specification covers (HOV) Advisory Exit (Ramp) Speed. Its official drawing provides the sign legend, layout, and design notes.
- W73(CA) · RIGHT (LEFT) LANE EXITS AHEAD →
The Caltrans W73(CA) specification covers RIGHT (LEFT) LANE EXITS AHEAD. Its official drawing provides the sign legend, layout, and design notes.
- W73A(CA) · RIGHT (LEFT) LANE TURNS RIGHT (LEFT) AHEAD →
The Caltrans W73A(CA) specification covers RIGHT (LEFT) LANE TURNS RIGHT (LEFT) AHEAD. Its official drawing provides the sign legend, layout, and design notes.
- W74(CA) · THRU TRAFFIC MERGE LEFT (RIGHT) →
The Caltrans W74(CA) specification covers THRU TRAFFIC MERGE LEFT (RIGHT). Its official drawing provides the sign legend, layout, and design notes.
- W74-1(CA) · (HOV) THRU TRAFFIC MERGE LEFT (RIGHT) →
The Caltrans W74-1(CA) specification covers (HOV) THRU TRAFFIC MERGE LEFT (RIGHT). Its official drawing provides the sign legend, layout, and design notes.
- W83P(CA) · PASS WITH CARE (plaque) →
The Caltrans W83P(CA) specification covers PASS WITH CARE (plaque). Its official drawing provides the sign legend, layout, and design notes.
- W84(CA) · SPEED HUMPS (BUMPS) AHEAD →
The Caltrans W84(CA) specification covers SPEED HUMPS (BUMPS) AHEAD. Its official drawing provides the sign legend, layout, and design notes.
- W85(CA) · SPEED HUMP (BUMP) AREA →
The Caltrans W85(CA) specification covers SPEED HUMP (BUMP) AREA. Its official drawing provides the sign legend, layout, and design notes.
- W86(CA) · FLOODING AHEAD TURN AROUND DON’T DROWN →
The Caltrans W86(CA) specification covers FLOODING AHEAD TURN AROUND DON’T DROWN. Its official drawing provides the sign legend, layout, and design notes.
- W88-2(CA) · METER ON (Activated Blank-Out) →
The Caltrans W88-2(CA) specification covers METER ON (Activated Blank-Out). Its official drawing provides the sign legend, layout, and design notes.
- W88-3(CA) · 210 WEST METER ON (Activated Blank-Out) →
The Caltrans W88-3(CA) specification covers 210 WEST METER ON (Activated Blank-Out). Its official drawing provides the sign legend, layout, and design notes.
- W89(CA) · PREPARE TO STOP (Activated Blank-Out) →
The Caltrans W89(CA) specification covers PREPARE TO STOP (Activated Blank-Out). Its official drawing provides the sign legend, layout, and design notes.
- W90(CA) · Emergency Scene Ahead →
The Caltrans W90(CA) specification covers Emergency Scene Ahead. Its official drawing provides the sign legend, layout, and design notes.
- S35(CA) · PLEASE DON'T DRINK AND DRIVE →
The Caltrans S35(CA) specification covers PLEASE DON'T DRINK AND DRIVE. Its official drawing provides the sign legend, layout, and design notes.
- S20(CA) · STATE PROPERTY - ANY PERSON REMOVING OR MOLESTING SAME WILL BE PROSECUTED →
The Caltrans S20(CA) specification covers STATE PROPERTY - ANY PERSON REMOVING OR MOLESTING SAME WILL BE PROSECUTED. Its official drawing provides the sign legend, layout, and design notes.
- W20-8 · Slow (STOP/SLOW Paddle) →
The SLOW face of a flagger's STOP/SLOW paddle tells approaching traffic to proceed slowly when directed by the flagger. The linked drawing also shows the separate R1-1 STOP face on the reverse side.
- C2(CA) · Road Closed →
Identifies a road closure at the signed location. Through travel beyond the closure is not available.
- C37(CA) · Traffic Control - Wait and Follow Pilot Car →
Tells traffic to wait and then follow the pilot car. It explains the controlled movement through the work area.
- C40(CA) · Traffic Fines Doubled in Construction Zones →
Displays the message that traffic fines are doubled in construction zones. The sign communicates the penalty notice; the applicable law determines the offenses and conditions covered.
- C40A(CA) · Traffic Fines Doubled in Work Zones →
Displays the message that traffic fines are doubled in work zones. The sign communicates the penalty notice without defining the legal conditions for a particular violation.
- G20-5aP · Work Zone (plaque) →
Adds the WORK ZONE designation to an associated sign assembly. As a plaque, it supplements the main message rather than providing a complete standalone instruction.
- R1-7 · Wait on Stop →
Tells road users to wait while a flagger displays STOP. It explains the STOP indication used in an alternating-flow traffic-control operation.
- R1-7a · Wait on Stop - Go on Slow →
Instructs road users at a flagger station to wait when the flagger displays STOP and proceed slowly when the flagger displays SLOW.
- R1-8 · Go on Slow →
Tells road users to proceed when a flagger displays SLOW and directs them to move. It explains the movement indication used with a STOP/SLOW paddle.
- R2-12 · End Work Zone Speed Limit →
Marks the end of a work-zone speed limit. Drivers must continue to follow the applicable speed limit and other posted controls beyond that point.
- R9-8 · Pedestrian Crosswalk →
Identifies a designated pedestrian crosswalk with the word legend PEDESTRIAN CROSSWALK, directing pedestrians to cross at that location.
- R9-9 · Sidewalk Closed →
Informs pedestrians that the sidewalk is closed at that location, signaling that they must not continue along the blocked walkway.
- R9-10 · Sidewalk Closed Use Other Side →
Tells pedestrians that the sidewalk is closed and directs them to use the sidewalk on the opposite side of the street.
- R9-11 · Sidewalk Closed Ahead Cross Here →
Advises pedestrians of a sidewalk closure ahead and directs them to cross at the indicated location before reaching the closure.
- R9-11a · Sidewalk Closed Cross Here →
Marks the point where pedestrians should cross because the sidewalk is closed, directing them to the open side at the crossing.
- R9-12 · Bike Lane Closed →
Identifies a bicycle lane that is closed. It marks the restriction itself, rather than serving as advance warning of a closure farther ahead.
- R11-2 · Road Closed →
A regulatory sign stating that the road is closed to all traffic, posted at the closure point typically on a barricade across the roadway.
- R11-2a · Street Closed →
Indicates that a street is closed to traffic, used to legally close a local street for work or an event.
- R11-2b · Bridge Out →
Identifies a bridge that is out of service or impassable. Road users cannot continue across the closed bridge and need an alternate route.
- R11-2c · Path Closed →
Indicates that a shared-use path (pedestrian/bicycle) is closed, directing users away from the closed path.
- R11-3 · Road Closed - Local Traffic Only →
Announces a road closure at the displayed distance while allowing local traffic access before the closure. Through traffic needs an alternate route.
- R11-3a · Street Closed - Local Traffic Only →
A regulatory sign stating that the street is closed except to local traffic, with the word legend STREET CLOSED / LOCAL TRAFFIC ONLY (a distance line is added on the advance version). Through traffic must use a detour; residents, businesses, and deliveries within the closure may proceed.
- R11-3b · Bridge Out - Local Traffic Only →
Warns that a bridge ahead is out (impassable) and that only local traffic should proceed toward it, with through traffic using an alternate route.
- R11-4 · Road Closed To Thru Traffic →
A regulatory sign stating that through travel is closed while still allowing local access to properties within the closure.
- R22-2 · Turn Off 2-Way Radio and Cell Phone →
Directs road users to turn off two-way radios and cell phones in the signed blasting area. It is an instruction associated with blasting operations.
- R115(CA) · PILOT CAR DO NOT PASS →
The Caltrans R115(CA) specification covers PILOT CAR DO NOT PASS. Its official drawing provides the sign legend, layout, and design notes.
- SC7(CA) · Ramp Closed - Use Ramp At (Street Name) →
Announces a ramp closure and identifies the street where drivers should use an alternate ramp. The street name is specific to the closure plan.
- SC10(CA) · Lane Closed Ahead →
Provides advance notice that a lane is closed. The message alerts approaching traffic to the lane restriction.
- SC11(CA) · Lane Closed →
Identifies a closed lane in the signed traffic-control arrangement.
- SC13(CA) · Do Not Pass →
Directs drivers not to pass in the signed area. It identifies the passing restriction in the traffic-control arrangement.
- SC15(CA) · Caution →
Displays a general CAUTION message for the signed traffic-control condition. The message does not identify a specific hazard by itself.
- C12(CA) · Narrow Lane →
Warns that a traffic lane is narrow. Drivers should expect reduced lateral clearance in the signed area.
- C19(CA) · Road Closed Ahead →
Warns of a road closure ahead. It gives drivers advance notice before they reach the closure.
- C20(CA) · Right Lane Closed Ahead →
Warns that the right lane is closed ahead. It gives drivers advance notice to prepare for the lane closure.
- C20A(CA) · Left (Word Legend Plate) →
Provides a LEFT overlay for a compatible lane-closure warning sign. It changes the indicated side of the closure and is not a standalone message.
- C20B(CA) · 2 (Numeral Plate) →
Provides a numeral overlay for a compatible lane-closure warning sign. The installed numeral specifies the number of affected lanes.
- C23(CA) · Road / Ramp Work Ahead →
Warns of work ahead on a road or ramp. The older drawing permits ROAD WORK AHEAD and RAMP WORK AHEAD; the current California manual identifies the ramp application as C23(CA).
- C23A(CA) · Ramp Work Ahead →
Warns that ramp work is taking place ahead. It alerts drivers to work affecting the ramp.
- C23BP(CA) · Highway Widening →
Identifies highway-widening work. The supplemental message describes the type of construction operation.
- C24(CA) · Shoulder Work Ahead →
Warns that shoulder work is taking place ahead. Drivers should expect workers or equipment near the edge of the traveled way.
- C27(CA) · Open Trench →
Warns of an open trench in the work area. The message identifies an excavation hazard.
- C30(CA) · Lane Closed →
Identifies a closed lane. It marks the lane restriction in the work area.
- C30A(CA) · Shoulder Closed →
Identifies a closed shoulder. It marks the area that is unavailable for shoulder use.
- C43(CA) · Fresh Concrete →
Warns of fresh concrete in the work area. It identifies the recently placed material that traffic must avoid disturbing.
- C44(CA) · Trucks Entering Exiting →
Warns that trucks are entering or exiting the roadway. Drivers should watch for construction-vehicle movements at the access point.
- C45(CA) · Rumble Strips →
Warns of rumble strips ahead or in the signed work area. It alerts drivers to the surface treatment and its vibration or sound.
- C46(CA) · Uneven Pavement →
Warns of uneven pavement. It calls attention to a change in roadway surface level in the work area.
- C46P(CA) · Uneven Pavement (Plaque) →
Adds an UNEVEN PAVEMENT message to an associated warning-sign assembly. The plaque identifies the surface condition addressed by the warning.
- G20-1 · Road Work Next XX Miles →
Informs drivers of the total length of a work zone, telling them how many miles of road work to expect ahead.
- G20-2 · End Road Work →
Marks the downstream end of a road-work zone. It identifies the end of the work signing and does not itself change a posted speed limit.
- G20-4 · Pilot Car Follow Me →
Tells traffic to follow the pilot car through the controlled section. The sign identifies the vehicle leading traffic through the work area.
- SC5(CA) · Special Event Ahead →
Warns that a special event is ahead. Drivers should expect event-related traffic or temporary traffic controls.
- SC19(CA) · Slow for the Cone Zone (Caltrans Logo Version) →
Displays the Caltrans SLOW FOR THE CONE ZONE campaign message with its logo and cone artwork. It encourages drivers to slow down near roadway work.
- SC20(CA) · Slow for the Cone Zone →
Displays SLOW FOR THE CONE ZONE on an orange sign. The message encourages drivers to reduce speed near roadway work.
- SC21(CA) · Caution - Frequent Stopping and Backing →
Warns that the work vehicle stops and backs frequently, and tells following traffic to stay back 100 feet. It identifies the vehicle's operating pattern and the displayed following-distance instruction.
- W1-4b · Reverse Curve (2 lanes) →
Warns of a two-lane reverse-curve alignment ahead — a curve in one direction followed by a curve in the other — such as a lane shift around a work area.
- W1-4c · Reverse Curve (3 lanes) →
Warns of a three-lane reverse-curve alignment ahead — a curve in one direction followed by a curve in the other — such as a multilane lane shift around a work area.
- W3-3 · Signal Ahead →
Warns with the traffic-signal symbol that a traffic control signal is ahead, giving drivers advance notice to be prepared to stop at the signal.
- W3-4 · Be Prepared To Stop →
Warns drivers that they may have to stop ahead, giving advance notice of a flagging station, queue, or signal that can require stopping.
- W4-1 · Merge →
Warns that another stream of traffic merges into the roadway ahead. The symbol shows the side from which the merging traffic enters.
- W4-2L · Left Lane Ends →
Warns that the left travel lane ends ahead and that traffic in the left lane must merge into the adjacent lane where the roadway narrows.
- W4-2R · Right Lane Ends →
Warns that the right travel lane ends ahead and that traffic in the right lane must merge into the adjacent lane where the roadway narrows.
- W5-4 · Ramp Narrows →
Warns that the width of a ramp is reduced ahead, so drivers approach the narrowed section with caution.
- W6-4 · Narrow Two-Way Traffic →
The W6-4 Narrow Two-Way Traffic sign warns that the roadway ahead narrows to a two-way, two-lane operation with opposing traffic on the other side of the center line. The two opposing arrows indicate traffic moving in both directions past the sign. In temporary traffic control it is shown on an orange background, commonly where a lane closure or crossover sets up a narrow two-way section.
- W8-24 · Steel Plate Ahead →
Warns that steel plates (trench plates) are in place on the roadway ahead, alerting drivers to the change in surface and possible bump.
- W9-2a · Merge Here Take Turns →
Supports a zipper (late) merge by telling drivers to merge at the closure point and take turns, keeping both lanes in use until the merge point.
- W9-3 · Interior Lane Shift Ahead →
Warns of an interior lane shift ahead in a temporary traffic arrangement. The arrows show the changed paths through the lane configuration.
- W9-5a · Bicycles Merging →
Warns drivers that bicyclists may merge into or share the travel lane ahead, prompting added caution where a bike facility is interrupted.
- W20-1 · Road Work Ahead →
Warns approaching drivers that a work operation is taking place on or near the roadway ahead so they can slow down and stay alert for changing conditions.
- W20-1(CA) · Road Work Ahead (California) →
Warns of road work ahead in a California temporary traffic-control arrangement. This catalog entry uses a California label for the federal W20-1 design; the linked official drawing is W20-1.
- W20-1b · Path Work (with distance) →
Warns path users that work is taking place ahead on the path. The distance legend gives advance notice before users reach the work area.
- W20-2 · Detour Ahead →
Warns drivers that a detour is ahead and that the normal route will be interrupted, prompting them to prepare to follow an alternate path.
- W20-2a · Bike Detour (with distance) →
Warns bicyclists that a detour is ahead. Its bicycle symbol, DETOUR legend, and distance line identify an upcoming change from the normal bicycle route.
- W20-3 · Road Closed Ahead →
Warns that the road ahead is closed and that through travel will not be possible, giving drivers time to turn or follow a detour before reaching the closure.
- W20-3a · Path Closed (with distance) →
Warns that a path is closed ahead. The distance line gives users advance notice so they can reach an available alternate route before the closure.
- W20-4 · One Lane Road Ahead →
Warns that two-way traffic will be reduced to a single shared lane ahead, where opposing directions must take turns through the work area.
- W20-5a · 2 Lanes Closed →
Warns that two travel lanes are closed ahead (shown with the distance to the closure) so drivers can merge out of the affected lanes well in advance.
- W20-5b · Bike Lane Closed →
Warns that the bicycle lane is closed ahead, with the word legend BIKE LANE CLOSED (a distance line is added on the advance version), so bicyclists can prepare to merge or follow a signed alternate route before reaching the work.
- W20-5L · Left Lane Closed →
Warns that the left-hand travel lane is closed ahead and that traffic in that lane must merge right before the work area. The distance legend may read AHEAD, a distance in feet, or a distance in miles.
- W20-5R · Right Lane Closed →
Warns that the right-hand travel lane is closed ahead and that traffic in that lane must merge left before the work area. The distance legend may read AHEAD, a distance in feet, or a distance in miles.
- W20-7 · Flagger (symbol) →
Uses a flagger symbol to warn drivers that a flagger is controlling traffic ahead and that they must be prepared to stop or follow the flagger's directions.
- W20-7(CA) · Flagger (California) (symbol) →
Uses the flagger symbol to warn of a flagging operation ahead. This catalog entry uses a California label for the federal W20-7 design; the linked official drawing is W20-7.
- W20-7a · Flagger (Distance) →
Warns that a flagger is controlling traffic ahead. The distance line identifies how far ahead the flagging operation is, or uses AHEAD in place of a numerical distance.
- W21-1 · Workers →
Uses a worker symbol to warn that workers are present on or near the roadway ahead, signaling drivers to reduce speed and increase caution.
- W21-1a · Workers →
Uses the word WORKERS to warn that workers are present on or near the roadway. This is the word-message counterpart to the W21-1 worker-symbol sign.
- W21-2 · Fresh Oil →
Warns of freshly applied oil or road-treatment material on the surface ahead. Drivers should expect a surface condition associated with the maintenance operation.
- W21-3 · Road Machinery Ahead →
Warns that road machinery is operating ahead. It alerts drivers to equipment working on, entering, or moving near the traveled way.
- W21-4 · Slow Moving Vehicle →
Warns approaching traffic of a slow-moving work vehicle. It is a rectangular work-zone message sign, distinct from the triangular slow-moving-vehicle emblem.
- W21-5 · Shoulder Work →
Warns that work is taking place on the shoulder ahead, alerting drivers to workers and equipment near the edge of the traveled way.
- W21-5a · Shoulder Closed →
Warns that the shoulder is closed ahead and is not available for stopping, disabled vehicles, or travel through the work area.
- W21-5b · Shoulder Closed (with distance) →
Warns that the indicated left or right shoulder is closed ahead. The distance line gives AHEAD or a numerical distance; the linked sheet contains both directional variants.
- W21-6 · Survey Crew →
Warns that a survey crew is working near the roadway. Drivers should watch for people and surveying equipment in the work area.
- W21-7 · Utility Work Ahead →
Warns that utility work is taking place on or near the roadway ahead, alerting drivers to utility crews, equipment, and possible lane or shoulder impacts.
- W21-8 · Mowing Ahead →
Warns that roadside mowing is taking place ahead. Drivers should watch for mowing equipment and associated maintenance vehicles near the roadway.
- W22-1 · Blasting Zone Ahead →
Warns that a blasting zone is ahead. It introduces the area where additional blasting-operation instructions may apply.
- W22-3 · End Blasting Zone →
Marks the end of a signed blasting zone. It closes out the zone identified by the blasting warning and associated instruction signs.
- W23-1 · Slow Traffic Ahead →
Warns approaching drivers that traffic ahead is moving slowly. It gives advance notice of a queue or work operation that can require a substantial speed reduction.
- W24-1 · Double Reverse Curve (1 lane) →
Shows one traffic lane following a double reverse curve through a temporary alignment. The left and right variants depict the direction of the first change in alignment.
- W24-1a · Double Reverse Curve (2 lanes) →
Shows two traffic lanes following a double reverse curve through a temporary alignment. Its two arrows depict the lanes continuing together through the alignment change.
- W24-1b · Double Reverse Curve (3 lanes) →
Shows three traffic lanes following a double reverse curve through a temporary alignment. Its three arrows depict the lanes continuing together through the alignment change.
- C38(CA) · Use Next Exit →
Directs drivers to use the next exit. It identifies the alternate departure in a temporary traffic-control arrangement.
- C48B(CA) · Construction Project Funding Identification Sign (Building CA) →
The Caltrans C48B(CA) specification covers Construction Project Funding Identification Sign (Building CA). Its official drawing provides the sign legend, layout, and design notes.
- C49D(CA) · Construction Project Funding Identification Sign (Clean CA and Building CA) →
The Caltrans C49D(CA) specification covers Construction Project Funding Identification Sign (Clean CA and Building CA). Its official drawing provides the sign legend, layout, and design notes.
- C50C(CA) · Construction Project Funding Identification Sign (Federal-Aid Highway Funds and Building CA) →
The Caltrans C50C(CA) specification covers Construction Project Funding Identification Sign (Federal-Aid Highway Funds and Building CA). Its official drawing provides the sign legend, layout, and design notes.
- C50D(CA) · Construction Project Funding Identification Sign (Federal-Aid Highway Funds and Building CA) →
The Caltrans C50D(CA) specification covers Construction Project Funding Identification Sign (Federal-Aid Highway Funds and Building CA). Its official drawing provides the sign legend, layout, and design notes.
- C51(CA) · Construction Project Funding Identification Sign (Local Funds) →
The Caltrans C51(CA) specification covers Construction Project Funding Identification Sign (Local Funds). Its official drawing provides the sign legend, layout, and design notes.
- M4-8 · Detour →
Identifies an approved detour route, marking the path drivers should follow around a closure when used with directional arrows.
- M4-8a · End Detour →
Marks the end of a signed detour route. It tells road users that the detour guidance has concluded at that point.
- M4-8P · Detour →
Identifies an associated route-sign assembly as a detour. The plaque works with the route number and directional information in the assembly.
- M4-9 · Detour (Right Arrow) →
Combines the word DETOUR with a directional arrow to point drivers toward the correct turn along the detour route. The official FHWA designation is M4-9 “Detour”; this site labels the right- and left-arrow orientations as M4-9 (Right Arrow) and M4-9L (Left Arrow) only to distinguish the two directions.
- M4-9a · Bicyclist/Pedestrian Detour →
Directs both bicyclists and pedestrians along a detour route with the bicycle and pedestrian symbols, the word DETOUR, and a directional arrow (M4-9aL/M4-9aR directional versions).
- M4-9b · Pedestrian Detour →
Directs pedestrians along an alternate accessible route when a sidewalk or crosswalk on their normal path is closed.
- M4-9b(CA) · Pedestrian Detour (California) →
Directs pedestrians along a detour using the pedestrian symbol and an arrow. This catalog entry uses a California label for the federal M4-9b design; the linked official drawing is M4-9b.
- M4-9c · Bicyclist Detour (with arrow) →
Directs bicyclists along a detour in the direction of the arrow. The bicycle symbol identifies the road users to whom the detour applies.
- M4-9L · Detour (Left Arrow) →
Combines the word DETOUR with a left-pointing arrow to direct drivers to turn left at this point of the detour route. Note: “M4-9L” is a directional label used on this site to identify the left-arrow version of the detour marker. FHWA does not issue M4-9L as a separate sign code — the official designation is M4-9 “Detour,” which is shown with either a left- or right-pointing arrow as the route requires.
- M4-10 · Detour →
Directs traffic along a detour using the word DETOUR within a large horizontal arrow. The linked sheet provides left- and right-pointing variants.
- SC3(CA) · Detour (Arrow) →
Directs traffic along a detour with a horizontal arrow. The arrow identifies the route to follow around the closure.
- SC8(CA) · (Street Name) Exit - Ramp Closed →
Identifies the named exit as having a closed ramp. The street name tells drivers which departure is affected.
- SC9(CA) · Freeway Detour (Arrow) →
Directs traffic along a freeway detour using an arrow. The optional freeway identification distinguishes the detour route being followed.
- SC18(CA) · Exit (Arrow) →
Identifies an exit direction in a temporary traffic-control arrangement. The arrow guides drivers to the available exit path.